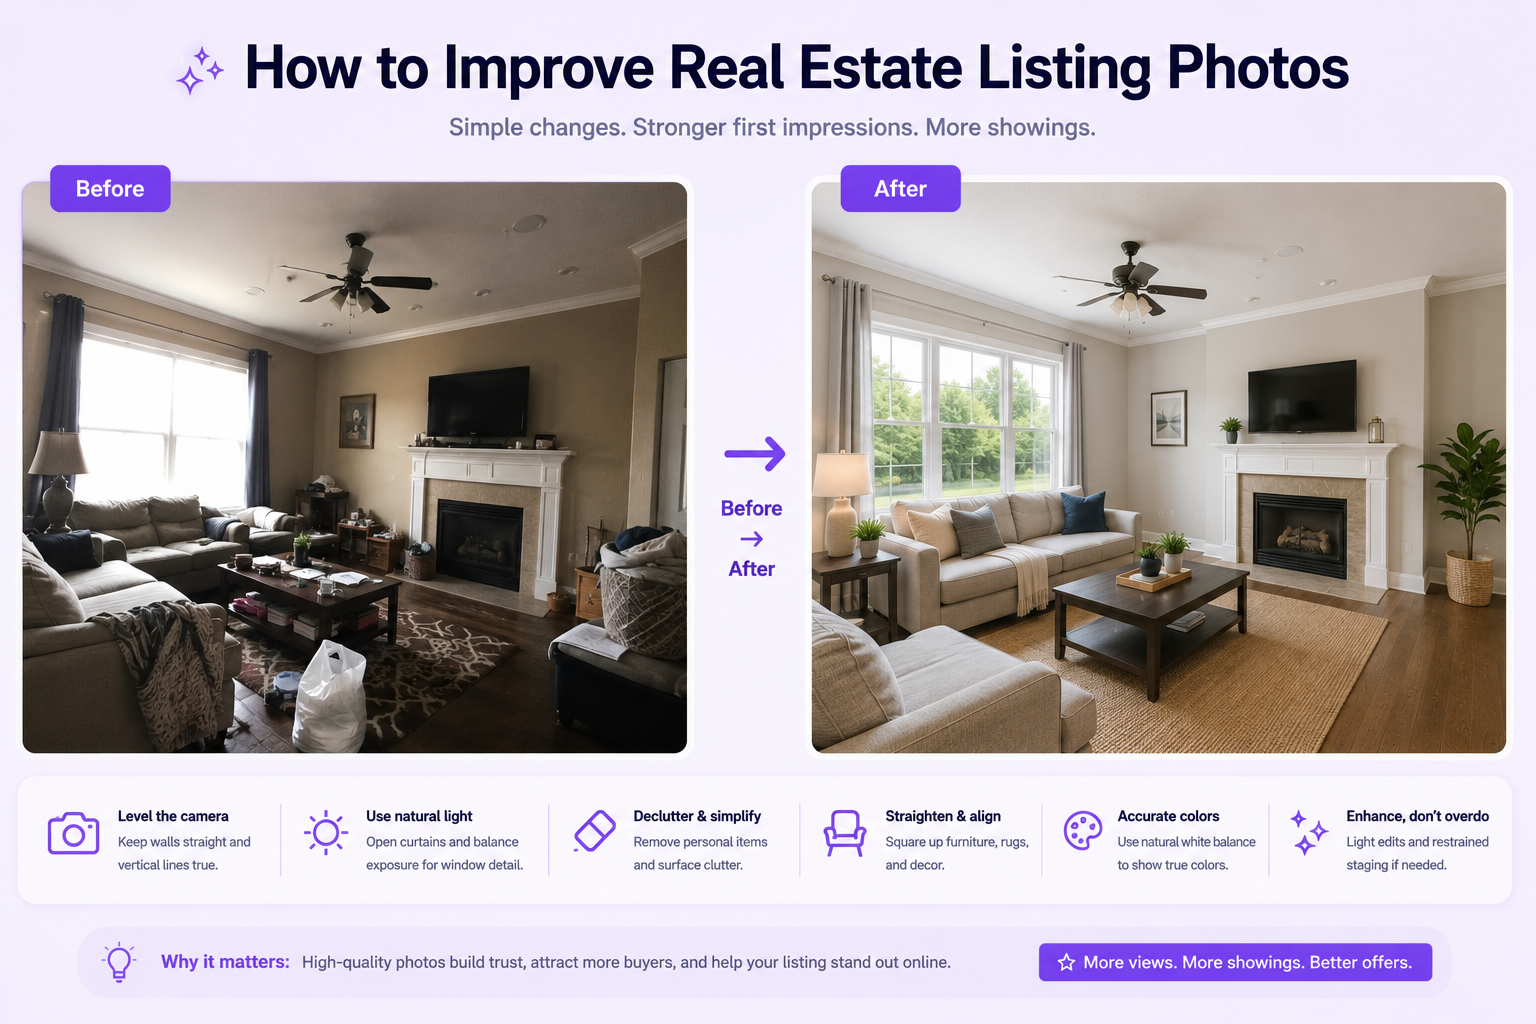
Real estate listing photos are often the first detailed look a buyer or renter gets at a property. Strong images help viewers understand the room layout, lighting, condition, finishes, scale, and overall atmosphere before arranging a visit.
Improving a property photo does not mean making the home look materially different. The goal is to present the real space clearly, consistently, and professionally.
Better results usually come from a combination of preparation, camera placement, lighting control, perspective correction, restrained editing, and selective use of AI.
This guide explains how to improve real estate listing photos before, during, and after the shoot, including virtual staging, object removal, image enhancement, disclosure, and final quality checks.
What Makes a Real Estate Listing Photo Effective?
An effective listing photo helps viewers understand the property quickly. Walls and vertical lines appear straight, the room function is clear, windows are visible, and the image feels bright without looking overexposed.
The composition should show usable floor area and important architectural features without exaggerating room size.
The editing should remain believable. Colors, materials, views, room dimensions, fixtures, and property condition should still match the real home.
Prepare the Property Before Taking Photos
The easiest way to improve listing photos is to improve the room before pressing the shutter. Editing cannot fully replace cleaning, organization, and thoughtful preparation.
Declutter Every Room
Remove loose cables, cleaning supplies, bins, paperwork, toiletries, food packaging, pet items, and unrelated personal objects. Keep a small number of deliberate decor pieces.
Clean Reflective Surfaces
Windows, mirrors, shower glass, appliances, countertops, taps, and polished floors reveal fingerprints, streaks, dust, and cleaning marks.
Straighten Furniture and Textiles
Align chairs, cushions, bedding, curtains, rugs, lamps, and table accessories. Small inconsistencies become obvious in wide room photos.
Remove Excess Personalization
Family photos, names, private documents, children’s details, and highly personal collections can distract buyers and create privacy concerns.
Replace Broken Bulbs
Use consistent bulb temperatures where possible. One cool bulb and several warm bulbs can create difficult color correction.
Open Curtains and Blinds
Allow natural light into the room while keeping outdoor views visible. Straighten blinds and curtains before shooting.
Check Exterior Areas
Move bins, hoses, tools, vehicles, toys, and temporary equipment away from entrances, gardens, balconies, and patios.
Use the Right Camera Height
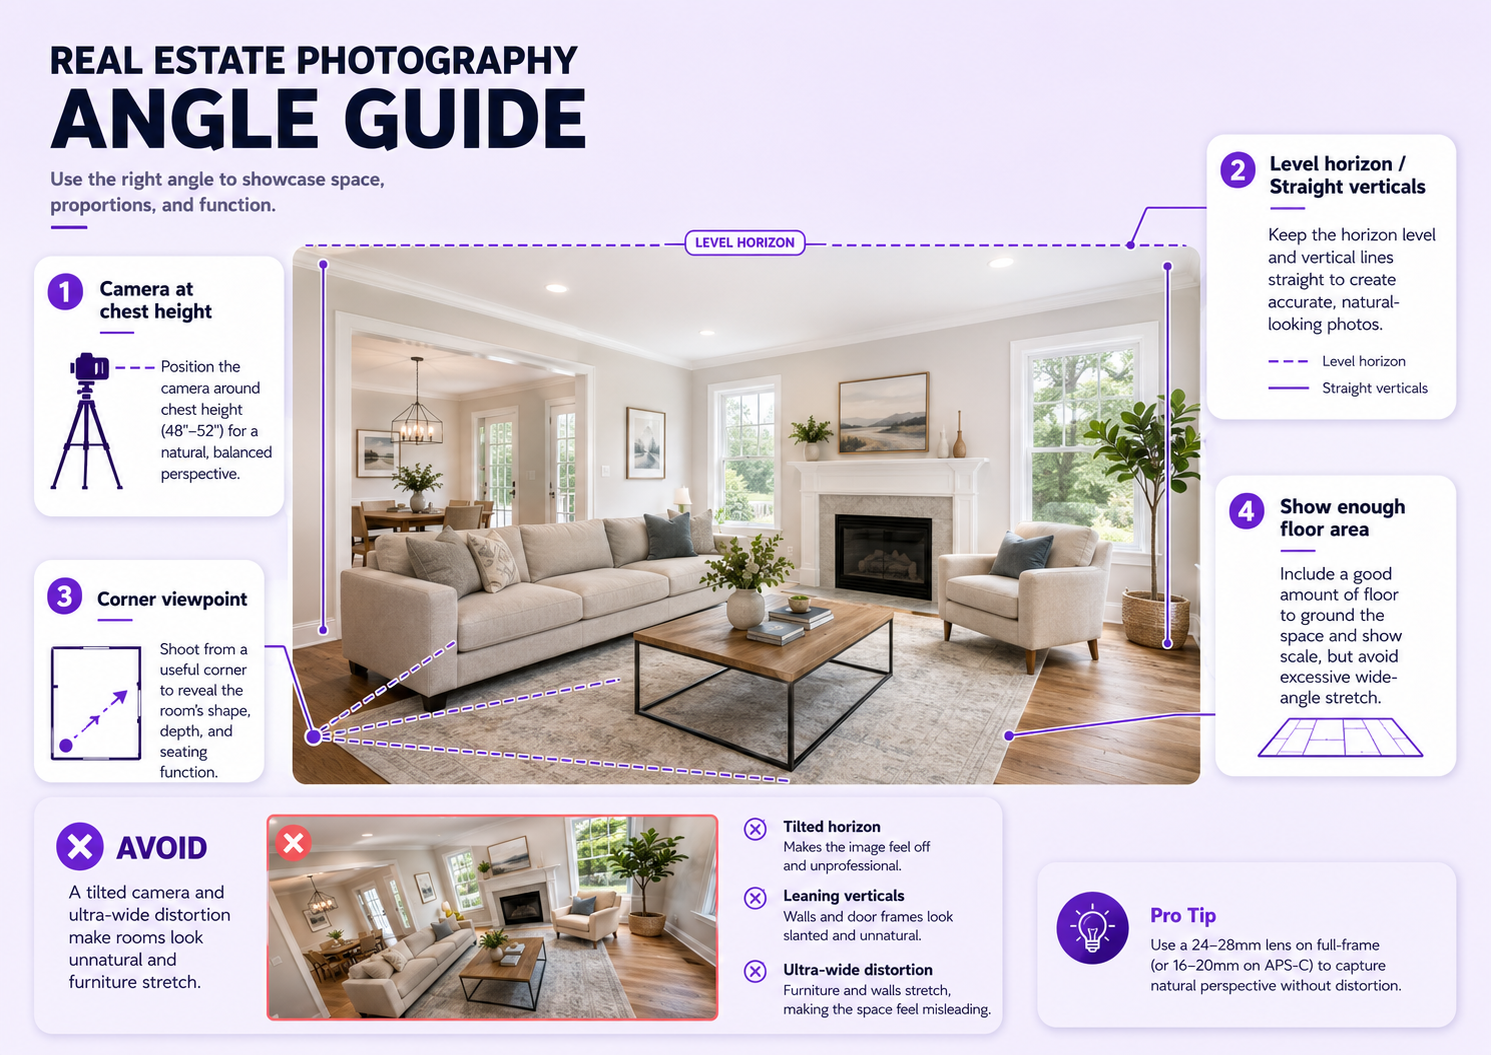
For most interior rooms, place the camera around chest height rather than eye level. This helps balance floor, furniture, walls, and ceiling.
The ideal height depends on the room. Kitchens may require a slightly higher position to show counters, while bedrooms and living rooms often look more natural from a lower viewpoint.
Avoid placing the camera too low, which can make furniture dominate, or too high, which can make the room feel like a surveillance image.
Keep Vertical Lines Straight
Walls, windows, doors, cabinets, and columns should remain vertical. Tilted verticals make a room feel distorted and can reduce trust.
Keep the camera level during the shoot and use perspective correction carefully during editing.
Do not stretch the room so aggressively that doors, furniture, or ceiling height become unrealistic.
Choose Better Shooting Angles
Photograph from a position that explains the room shape and connects major features.
Corners often provide useful coverage, but the widest possible view is not always the best. A slightly narrower angle may produce a more natural representation.
Show the Main Function
For a living room, show the seating area and focal point. For a bedroom, show the bed and room circulation. For a kitchen, show counters, appliances, and the working layout.
Include Doorways Carefully
A doorway can explain room connections, but too many openings may make the composition confusing.
Avoid Shooting Directly into Clutter
Choose the angle that minimizes unrelated objects, reflections, unfinished areas, and visual overlap.
Create a Logical Image Sequence
Arrange listing photos so viewers move naturally from exterior to entrance, main living spaces, bedrooms, bathrooms, secondary rooms, and outdoor areas.
Use Natural Light Carefully
Natural daylight can make rooms feel open and realistic, but uncontrolled windows may become too bright while the interior remains dark.
Photograph when the room receives soft daylight rather than harsh direct sun. Open curtains, turn on permanent lights when useful, and avoid strong color casts.
For difficult scenes, bracketed exposures can preserve both interior and window detail. Blend them naturally rather than creating an exaggerated HDR effect.
Avoid Uneven Mixed Lighting
Daylight, warm ceiling lights, cool LEDs, and colored accent lights can create inconsistent color across a room.
When possible, use one dominant light source or keep permanent lights consistent. Correct color selectively during editing.
Do not neutralize every warm light completely if it is part of the property’s real atmosphere.
Photograph Windows and Views Accurately
Windows should remain visible enough to explain the light source and exterior context.
Do not replace a real window view with a more attractive scene, enlarge the window, or create outdoor features that are not present.
Correct exposure and reflections, but keep the actual location and view believable.
Use a Tripod
A tripod improves sharpness, consistency, perspective, and exposure control.
It also makes it easier to create bracketed exposures, maintain the same camera height, and photograph connected rooms with a consistent visual style.
Use a timer or remote shutter to avoid camera movement.
Use a Wide-Angle Lens Responsibly
A moderate wide-angle lens helps show more of the room, but excessive width can stretch walls, furniture, and floor area.
Avoid placing important furniture at the extreme edges of the frame, where lens distortion is strongest.
The image should help viewers understand the room, not imply dimensions that the property does not have.
Improve Exterior Listing Photos
Exterior images should show the entrance, building shape, access, landscaping, and immediate surroundings clearly.
Photograph when the facade receives favorable light. Remove temporary clutter and ensure paths, windows, doors, and garden areas look maintained.
Keep the sky, grass, plants, and facade color realistic. Excessive saturation and artificial sky replacement can make the image look synthetic.
Improve Kitchen Photos
Clear counters except for a small number of intentional items. Remove dish racks, cleaning bottles, food packaging, magnets, and loose appliances where appropriate.
Keep cabinet lines straight and preserve the real color of countertops, cabinets, appliances, and flooring.
Use angles that explain the working layout rather than showing only one attractive section.
Improve Bathroom Photos
Remove toiletries, toilet brushes, cleaning products, personal towels, and visible packaging.
Clean mirrors, glass, taps, tiles, and reflective fixtures. Small marks become highly visible in bright bathroom photos.
Avoid ultra-wide distortion that makes the bathroom appear much larger. Preserve the real placement of the sink, shower, bath, toilet, and storage.
Improve Bedroom Photos
Use clean bedding, aligned pillows, straight curtains, clear bedside tables, and restrained decor.
Show enough floor area to explain circulation around the bed.
Do not use furniture scale or digital staging to imply that a larger bed fits when the room cannot support it realistically.
Improve Living Room Photos
Arrange seating around the room’s real focal point, such as a fireplace, window, or media wall.
Straighten rugs, cushions, lamps, tables, and artwork. Remove extra chairs or decor that make the room feel crowded.
Use a wide but natural composition that shows the seating zone and room connections.
Edit Real Estate Photos Carefully
Editing should improve visibility and consistency without creating a different property.
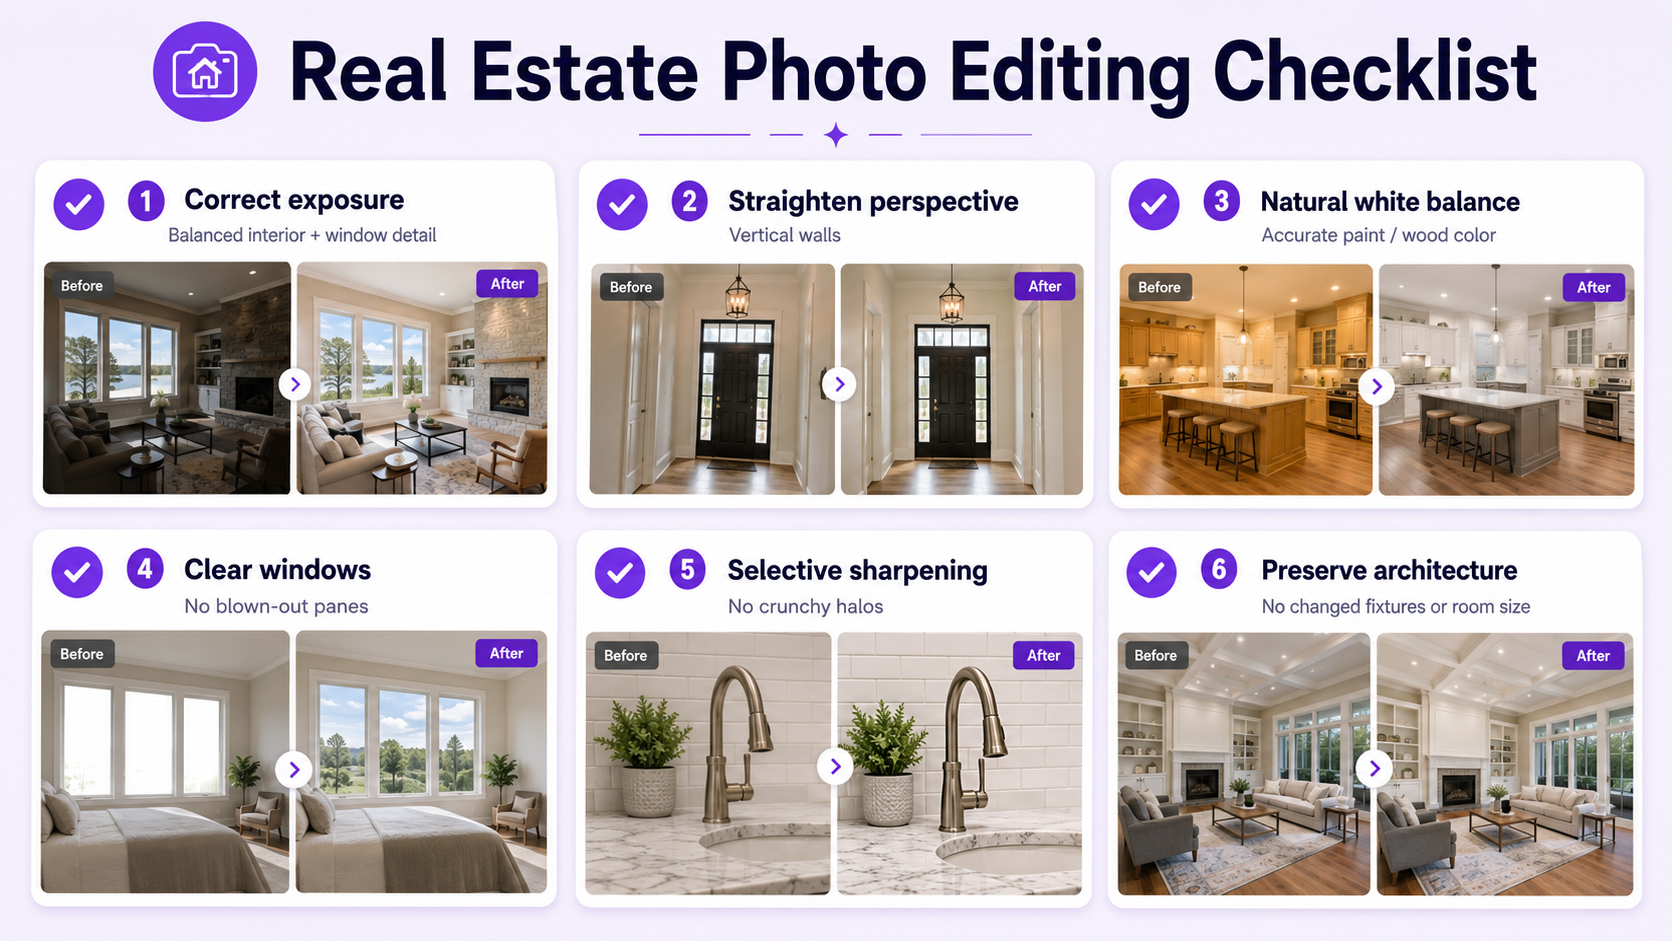
Correct Exposure
Lift dark interiors carefully and recover bright highlights where possible. Avoid flat, gray, or excessively bright results.
Correct White Balance
Remove unwanted color casts while preserving the real warmth or coolness of materials and lighting.
Straighten Perspective
Correct leaning walls and distorted lines without stretching the room or furniture.
Adjust Contrast
Use enough contrast to define materials and depth, but keep detail in shadows and windows.
Improve clarity without creating halos, crunchy textures, or exaggerated detail.
Reduce Noise
Clean low-light noise carefully while preserving real texture in wood, stone, fabric, and walls.
Keep Colors Accurate
Flooring, paint, cabinets, tiles, and exterior finishes should resemble the actual property.
Use AI to Enhance Listing Photos
AI can help correct lighting, reduce noise, sharpen soft details, remove temporary distractions, replace backgrounds in isolated marketing images, expand the canvas, or stage empty rooms.
Use AI selectively. The property itself must remain accurate.
AI Lighting Enhancement Prompt
Improve this interior photo with balanced natural daylight, visible window detail, realistic interior brightness, neutral color balance, and preserved material texture. Do not change the room, furniture, fixtures, architecture, or view.
AI Decluttering Prompt
Remove only the selected temporary clutter and reconstruct the hidden surfaces naturally. Preserve the exact flooring, walls, furniture, fixtures, shadows, room structure, and perspective.
AI Exterior Enhancement Prompt
Improve this exterior property photo with balanced daylight, natural sky detail, accurate facade color, realistic landscaping, and corrected perspective. Preserve the actual building, windows, doors, roof, driveway, surroundings, and property condition.
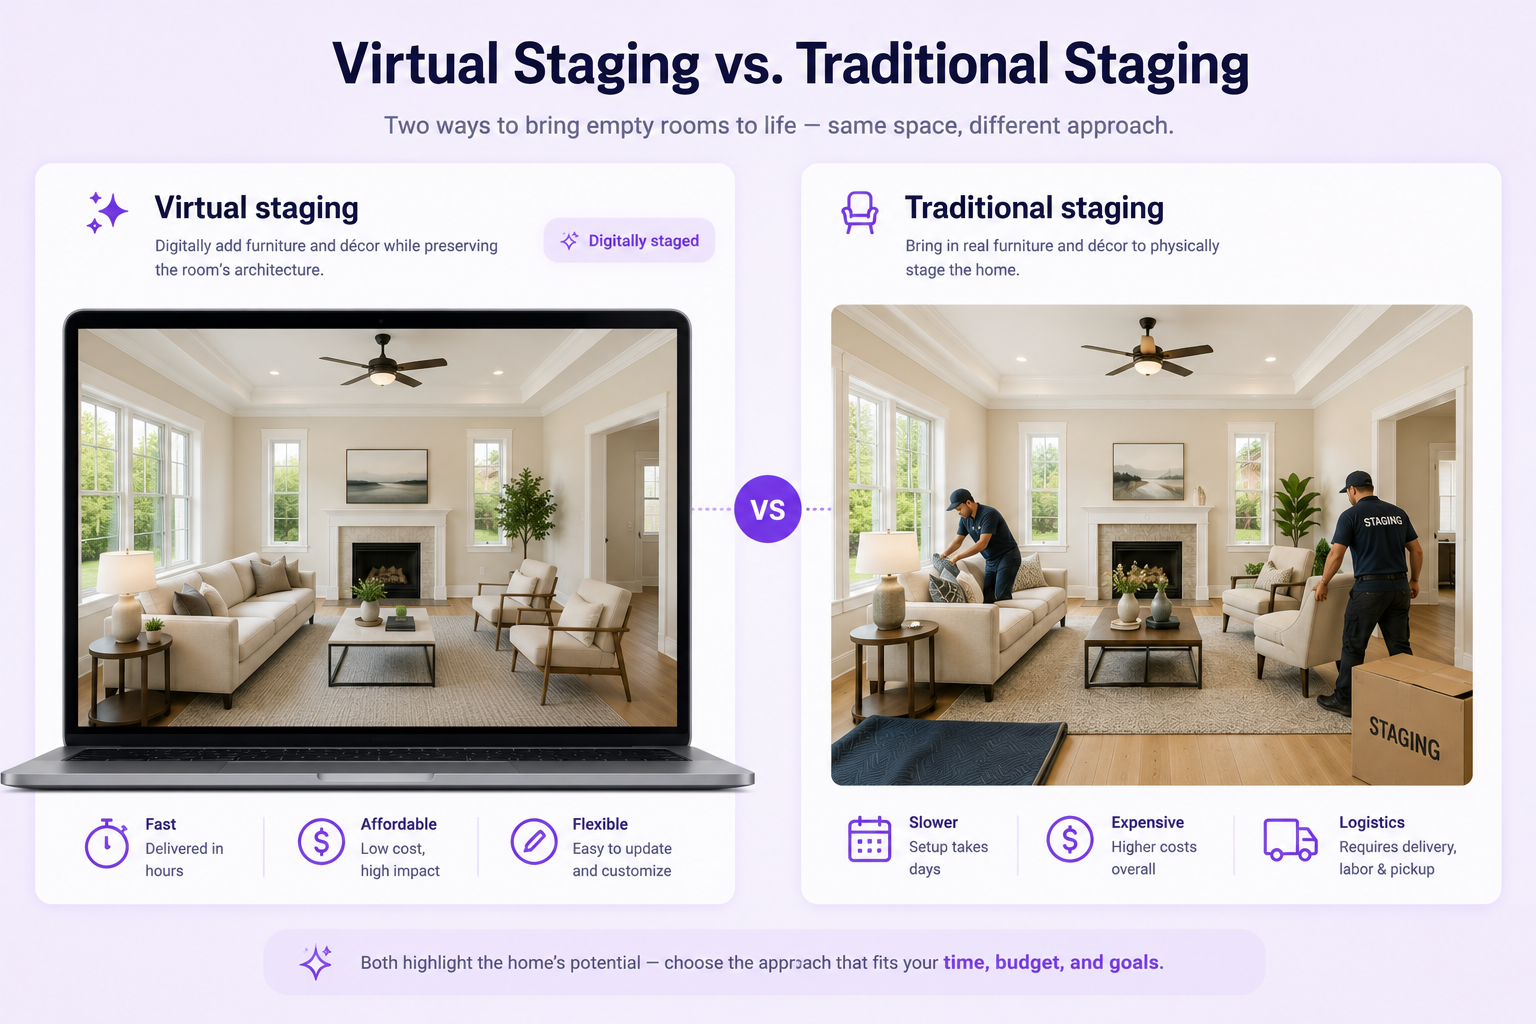
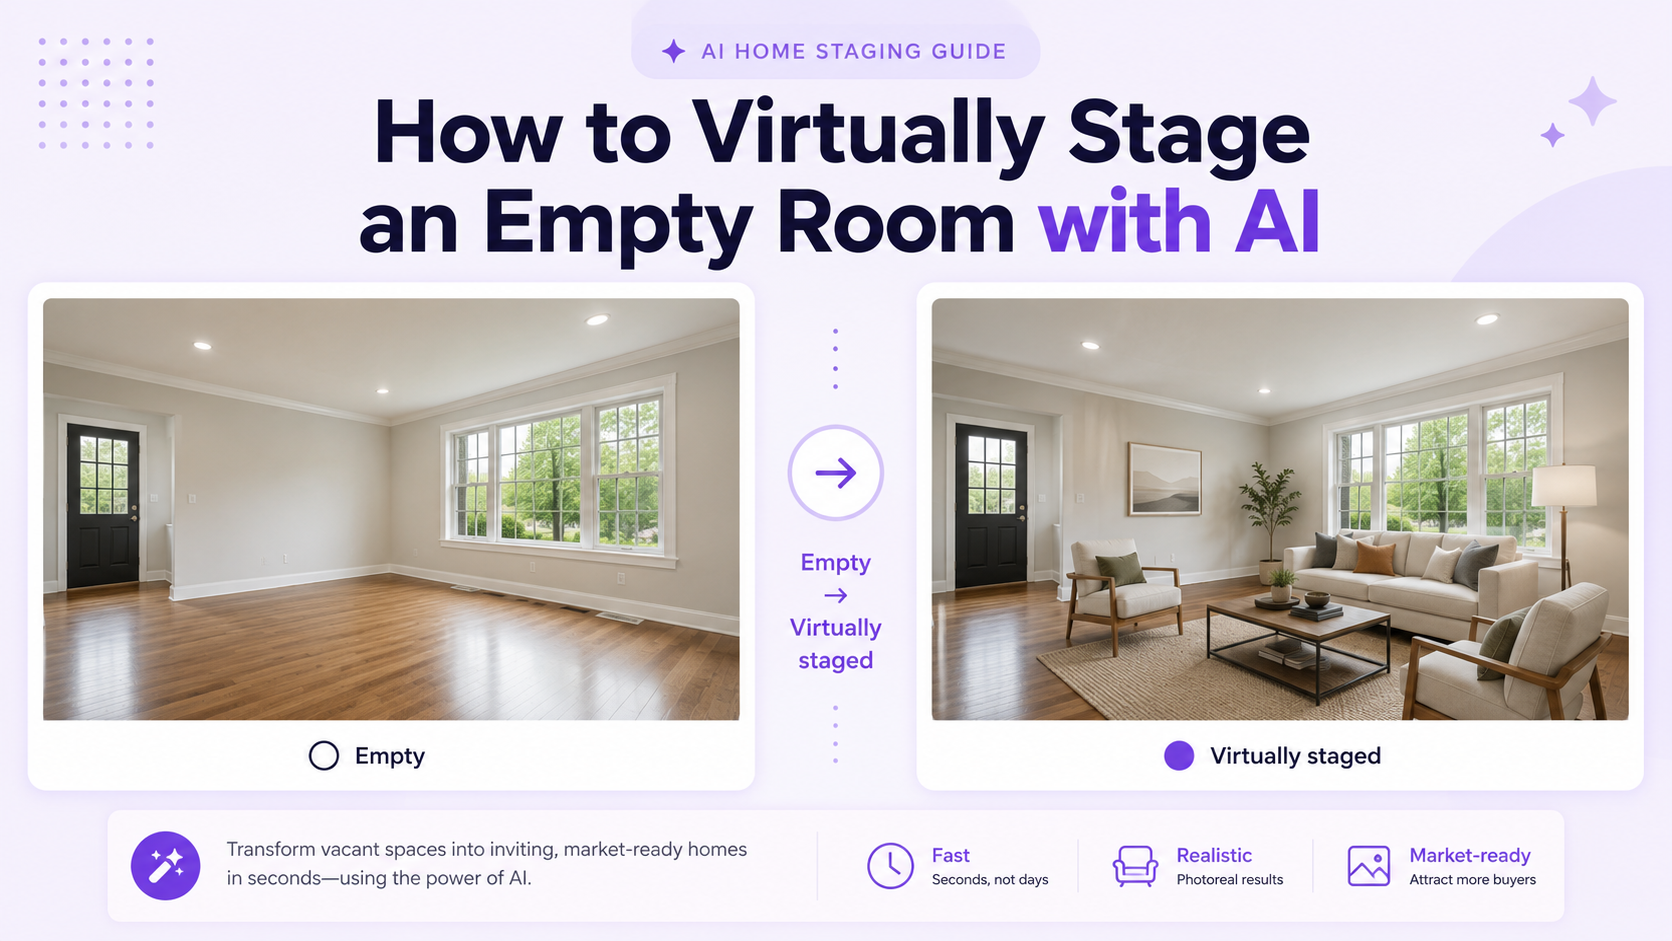
Use Virtual Staging for Empty Rooms
Virtually stage an empty room can help viewers understand how an empty room might function when furnished.
Add correctly scaled furniture and preserve the exact walls, windows, doors, flooring, ceiling, built-ins, fixtures, and room proportions.
Use consistent interior styling across the listing and include virtual staging disclosure rules.
When practical, publish the original empty-room photo alongside the virtually staged version.
When to Remove Objects
Temporary objects such as cleaning tools, loose cables, bins, boxes, or a photographer reflection may be appropriate to remove.
Do not remove permanent defects, structural issues, neighboring buildings, power lines, fixtures, stains, damage, or material property conditions merely to make the listing more attractive.
Object removal should clean the presentation, not conceal relevant information.
Avoid Misleading Improvements
Do not enlarge rooms, change ceiling height, add windows, replace views, remove structural elements, create finished renovations, or alter permanent property features.
Do not replace flooring, cabinets, countertops, landscaping, pools, balconies, appliances, or fixtures unless the image is clearly labeled as a renovation concept.
Listing photography should help viewers understand the property accurately.
Create Consistency Across the Listing
Use the same exposure style, white balance, perspective correction, crop, and sharpening level across the full image set.
Connected rooms should feel like they were photographed during the same session.
Avoid mixing bright high-key images, dark dramatic images, heavily saturated photos, and soft low-contrast edits in one listing.
How Many Photos Should a Listing Include?
The number depends on the size and complexity of the property. Every important room, exterior area, feature, and layout transition should be represented.
Avoid publishing many nearly identical angles. Each image should provide new information.
A concise, logical gallery is easier to understand than a large collection of repetitive photos.
Arrange Photos in a Logical Order
Begin with the strongest exterior or main living-space image, depending on the listing strategy.
Then guide viewers through the entrance, living room, kitchen, dining area, bedrooms, bathrooms, secondary spaces, exterior areas, and special features.
Keep connected rooms near each other in the gallery so the layout feels understandable.
Real Estate Photo Quality Checklist
Confirm that walls, doors, windows, cabinets, and other vertical lines appear straight.
Check exposure, white balance, sharpness, window detail, reflections, and shadow areas.
Inspect mirrors, glass, appliances, taps, floors, and countertops for visible marks.
Verify that room dimensions, architecture, views, finishes, fixtures, and property condition remain accurate.
Check virtual staging, object removal, and AI enhancement for distorted furniture, repeated objects, or changed surfaces.
Review the full gallery for consistent color, crop, brightness, and image order.
Add disclosure where virtual staging or material digital editing requires it.
Common Real Estate Photography Mistakes
Using Excessive Wide-Angle Distortion
Extreme lenses can make rooms look much larger and stretch furniture near the frame edges.
Tilting the Camera
Leaning verticals make the room appear unstable or poorly photographed.
Overexposing Windows
Completely white windows remove useful context and make the image look artificial.
Using Heavy HDR
Excessive local contrast can create halos, gray shadows, unnatural colors, and unrealistic room depth.
Ignoring Clutter
Temporary objects and personal items distract buyers and reduce visual clarity.
Publishing Inconsistent Edits
Different brightness, color, and perspective styles make the listing feel unprofessional.
Using Misleading AI Changes
Changed architecture, views, defects, dimensions, or permanent features can misrepresent the property.
Final Recommendation
The best way to improve real estate listing photos is to begin with a clean, well-prepared property and a clear photographic plan.
Use level camera positions, natural lighting, realistic wide-angle coverage, restrained editing, and a logical image sequence.
Use AI for enhancement, decluttering, and virtual staging only when the property’s architecture, condition, scale, materials, and permanent features remain accurate.
AI virtual staging offers a template-first workflow for real estate enhancement, virtual staging, furniture removal, interior transformation, and listing-ready visual variations.
FAQ
How can I improve real estate listing photos?
Prepare and declutter the property, use a level camera and tripod, control the lighting, choose useful angles, correct perspective, and edit colors and exposure naturally.
What lighting is best for real estate photos?
Soft natural daylight combined with consistent permanent lighting works well. Avoid harsh direct sun, strong mixed color temperatures, and completely overexposed windows.
Should real estate photos use a wide-angle lens?
A moderate wide-angle lens can help explain the room, but excessive width may distort furniture and make the space appear larger than it is.
Can AI improve property listing photos?
Yes. AI can improve lighting, sharpness, color balance, clutter removal, composition, and virtual staging while preserving the actual property.
Can I remove objects from real estate photos?
Temporary clutter may be removed, but permanent defects, fixtures, neighboring structures, and material property conditions should remain visible.
Can I virtually stage an empty room?
Yes. Add realistically scaled furniture while preserving the exact architecture, dimensions, windows, doors, flooring, fixtures, and room perspective.
Should virtually staged photos be disclosed?
Disclosure rules vary, but virtual staging should generally be identified clearly enough to prevent viewers from believing the digital furniture is physically present.
Does GenImagePro require a real estate editing prompt?
Not always. GenImagePro offers ready-made real estate and interior templates for enhancement, virtual staging, furniture removal, and room transformation.