Professional car listing photos help buyers understand the vehicle before they contact the seller. Clear images reduce uncertainty around condition, color, body shape, interior quality, wheels, features, and overall presentation.
You do not need a large automotive studio to create effective listing photos. A clean car, controlled location, soft light, consistent camera height, and complete angle sequence can produce strong results with a phone or camera.
AI can extend that workflow when the original location is distracting or inconsistent. AI car photography tools help replace backgrounds, improve lighting, clean temporary distractions, create dealership-style scenes, expand the frame, and generate coordinated marketing variations from a real vehicle photo.
The vehicle itself must remain accurate. The make, model, body shape, paint color, trim, wheels, lights, windows, badges, plate area, interior, damage, and proportions should not be changed.
This guide explains how to take professional car listing photos, which angles to capture, how to photograph the interior, how to edit accurately, and how to use GenImagePro without misrepresenting the vehicle.
What Makes a Car Listing Photo Professional?
A professional listing image is clear, consistent, and informative. The car should be large enough to inspect, fully visible, properly exposed, and separated from the background.
The image should also match the real vehicle. Buyers should see the actual paint, wheels, trim, body condition, glass, lights, interior materials, and features.
Professional presentation does not mean hiding defects. It means removing avoidable distractions while showing the car accurately.
Prepare the Car Before the Shoot
Preparation has a larger effect than expensive equipment. A clean, organized vehicle will look more valuable and trustworthy in every image.
Wash and Dry the Exterior
Remove dirt, water spots, road dust, mud, and residue. Dry the body carefully so streaks do not appear in reflections.
Clean the Wheels and Tires
Brake dust and dirty sidewalls are highly visible. Clean the wheels, tire surfaces, and wheel arches.
Clean the Windows and Mirrors
Remove fingerprints, haze, streaks, stickers, and temporary marks from glass and mirrors.
Vacuum and Wipe the Interior
Clean seats, mats, dashboard, screens, cupholders, door panels, trunk, and visible storage areas.
Remove Personal Items
Take out cables, bottles, bags, child seats, receipts, air fresheners, papers, and unrelated accessories unless they are included with the vehicle.
Straighten the Steering Wheel
Keep the wheels and steering wheel intentionally positioned. Small alignment errors make the vehicle look carelessly presented.
Check Lights and Displays
Confirm that headlights, daytime running lights, interior screens, and dashboard displays are presented intentionally rather than accidentally.
Preserve Real Condition
Do not hide scratches, dents, worn upholstery, cracked trim, warning lights, or other relevant defects.
Choose the Right Location
The location should help the car stand out without creating visual confusion.
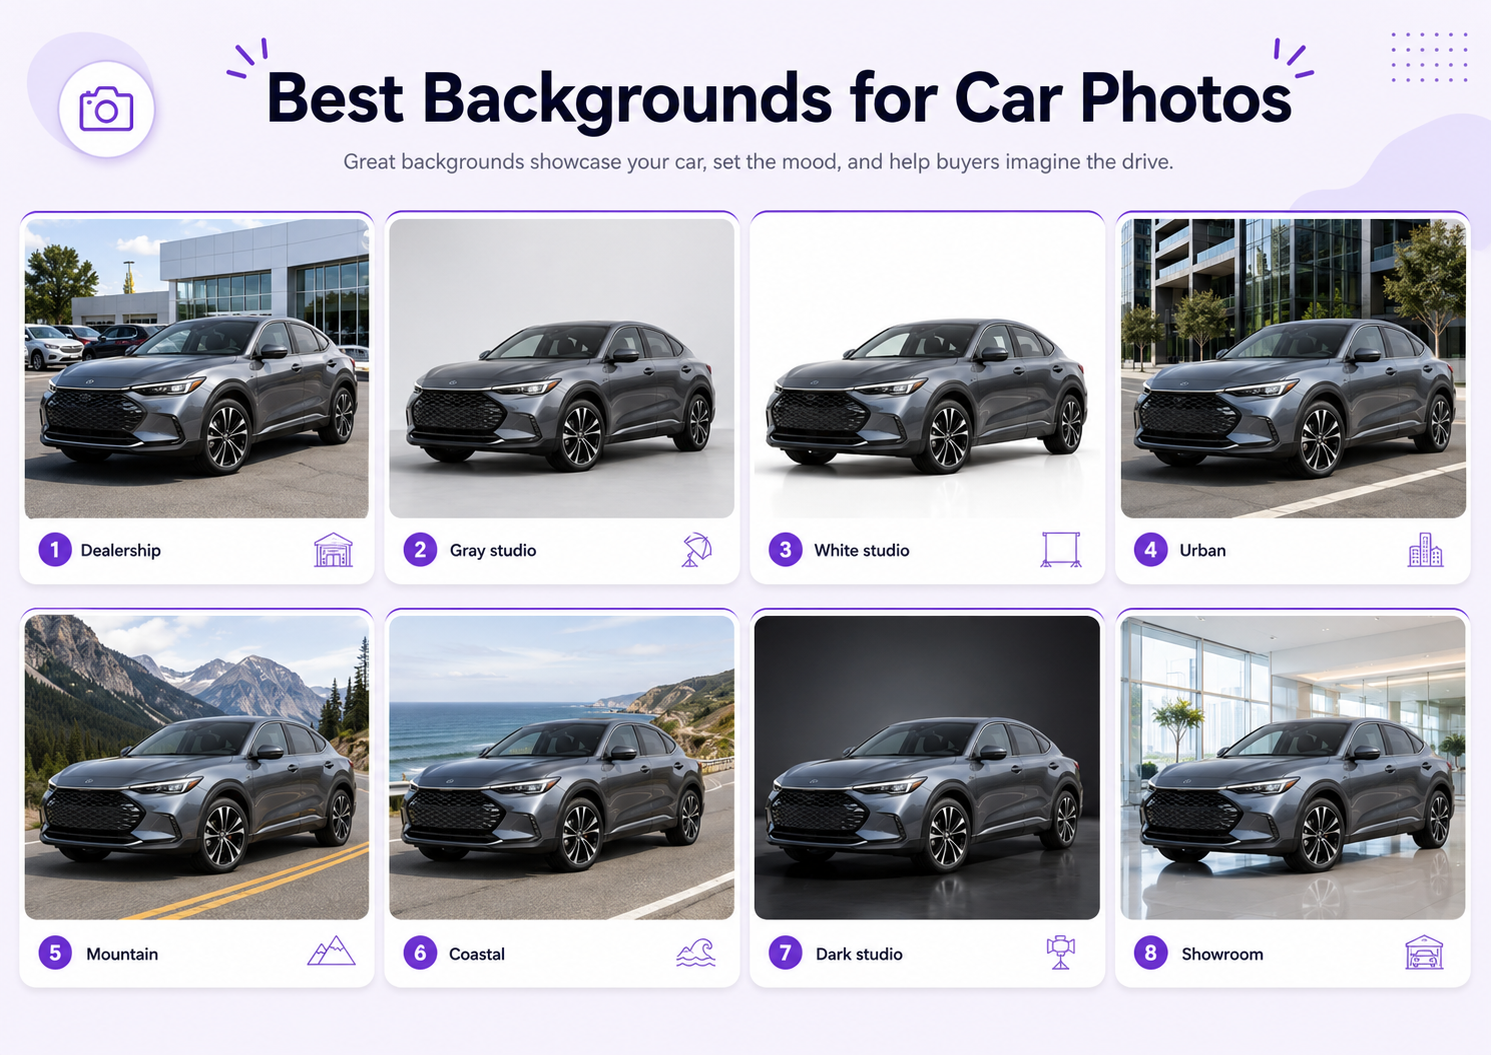
A clean dealership lot, quiet paved area, simple industrial wall, parking structure, neutral roadside, or open outdoor location can work.
Avoid crowded streets, visible rubbish, strong signage, other vehicles overlapping the car, people in the frame, and backgrounds that create reflections across the paint.
Consider the Ground Surface
Clean asphalt, concrete, or paving usually works better than uneven grass, mud, loose gravel, or surfaces that create distracting shadows.
The car should sit level. A sloped location can make the suspension or body proportions appear unusual.
Use GenImagePro When the Location Is Not Suitable
A strong source photo may still have a poor background. GenImagePro can replace a busy parking lot, residential street, or cluttered dealership area with a clean studio, premium outdoor scene, modern showroom, or neutral listing background.
Use the original car as the exact reference and preserve the body shape, wheels, paint, trim, badges, windows, lights, proportions, and camera angle.
Best Time of Day for Car Photography
Soft daylight is usually easier to control than harsh midday sun.
Early morning, late afternoon, bright overcast conditions, or open shade can reduce hard reflections and deep shadows.
Direct midday light may create blown highlights on the hood, dark wheel arches, strong windshield glare, and uneven paint color.
Photographing at Golden Hour
Golden hour can create attractive warm light, but it may shift the real paint color. Correct color carefully and avoid making a neutral car appear orange or overly saturated.
Photographing Under Overcast Light
Cloudy conditions create broad, soft reflections and are often effective for black, white, silver, and metallic cars.
Use a Consistent Camera Height
Keep the camera around the height of the vehicle’s window line, headlights, or slightly above the hood for most exterior views.
A camera placed too high can make the roof dominate. A camera placed too low can exaggerate the front bumper, wheels, or body height.
Use a similar height and distance across the full listing so the images feel coordinated.
Avoid Extreme Wide-Angle Distortion
Very wide lenses can stretch the front or rear of the vehicle and make the cabin or wheels look disproportionate.
Step farther back and use the standard lens or a moderate focal length. Avoid digital zoom, especially on a phone.
The car should look like the real vehicle, not a dramatic automotive advertisement with altered proportions.
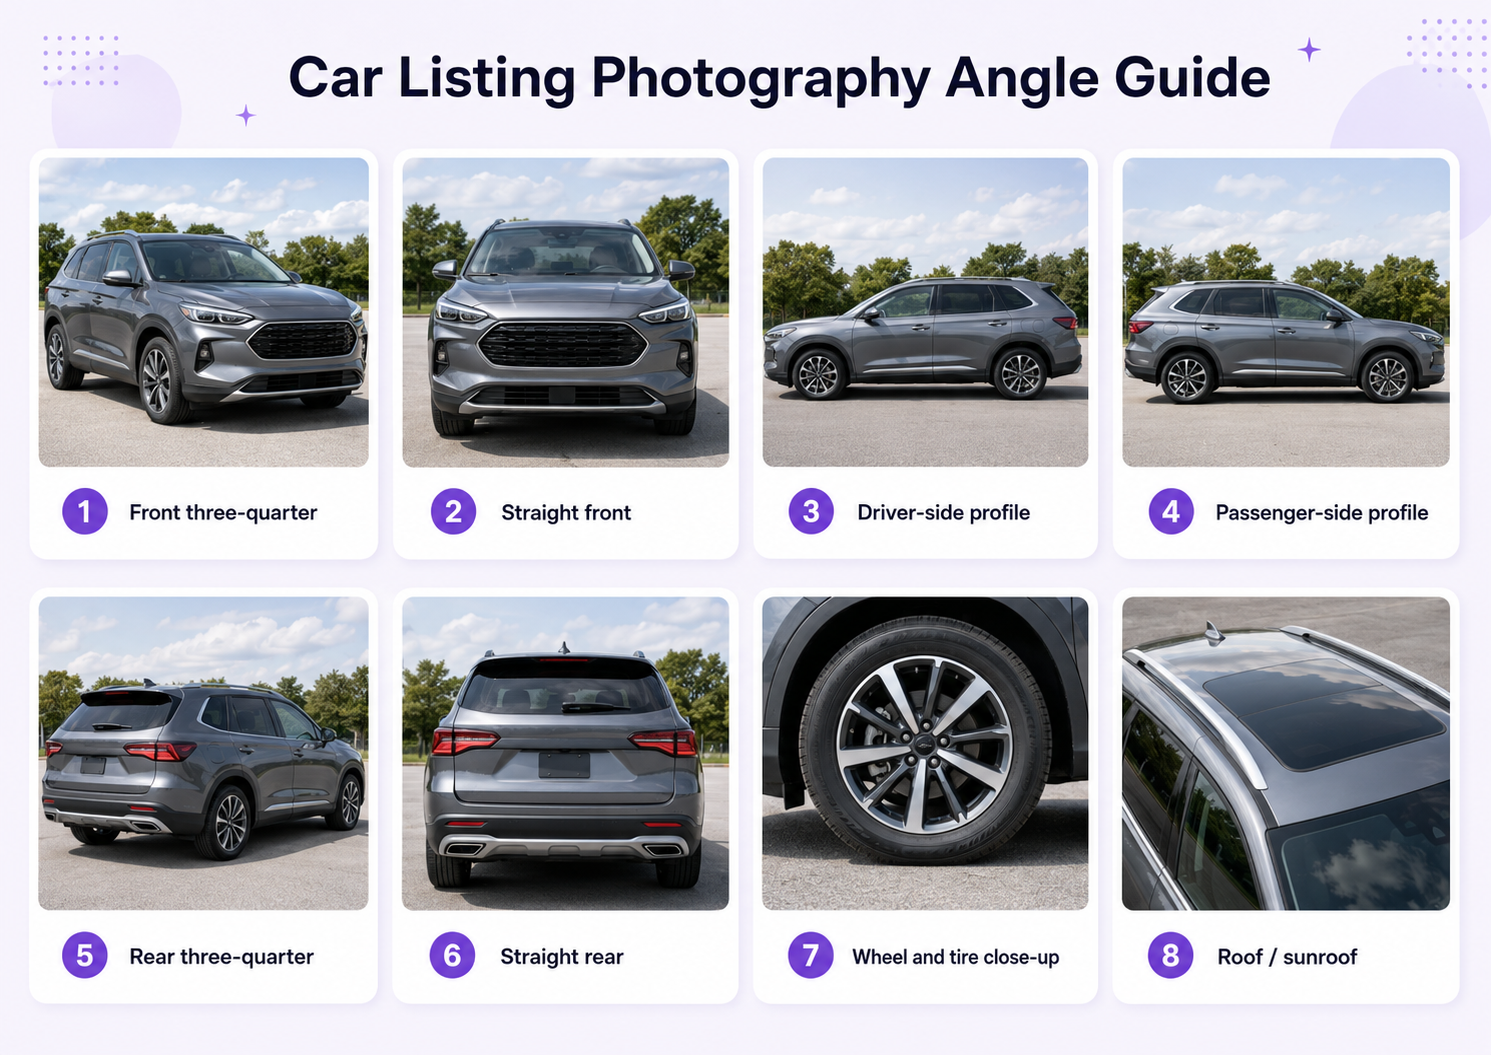
Essential Exterior Car Listing Angles
A complete listing should show the car from a logical sequence of exterior angles.
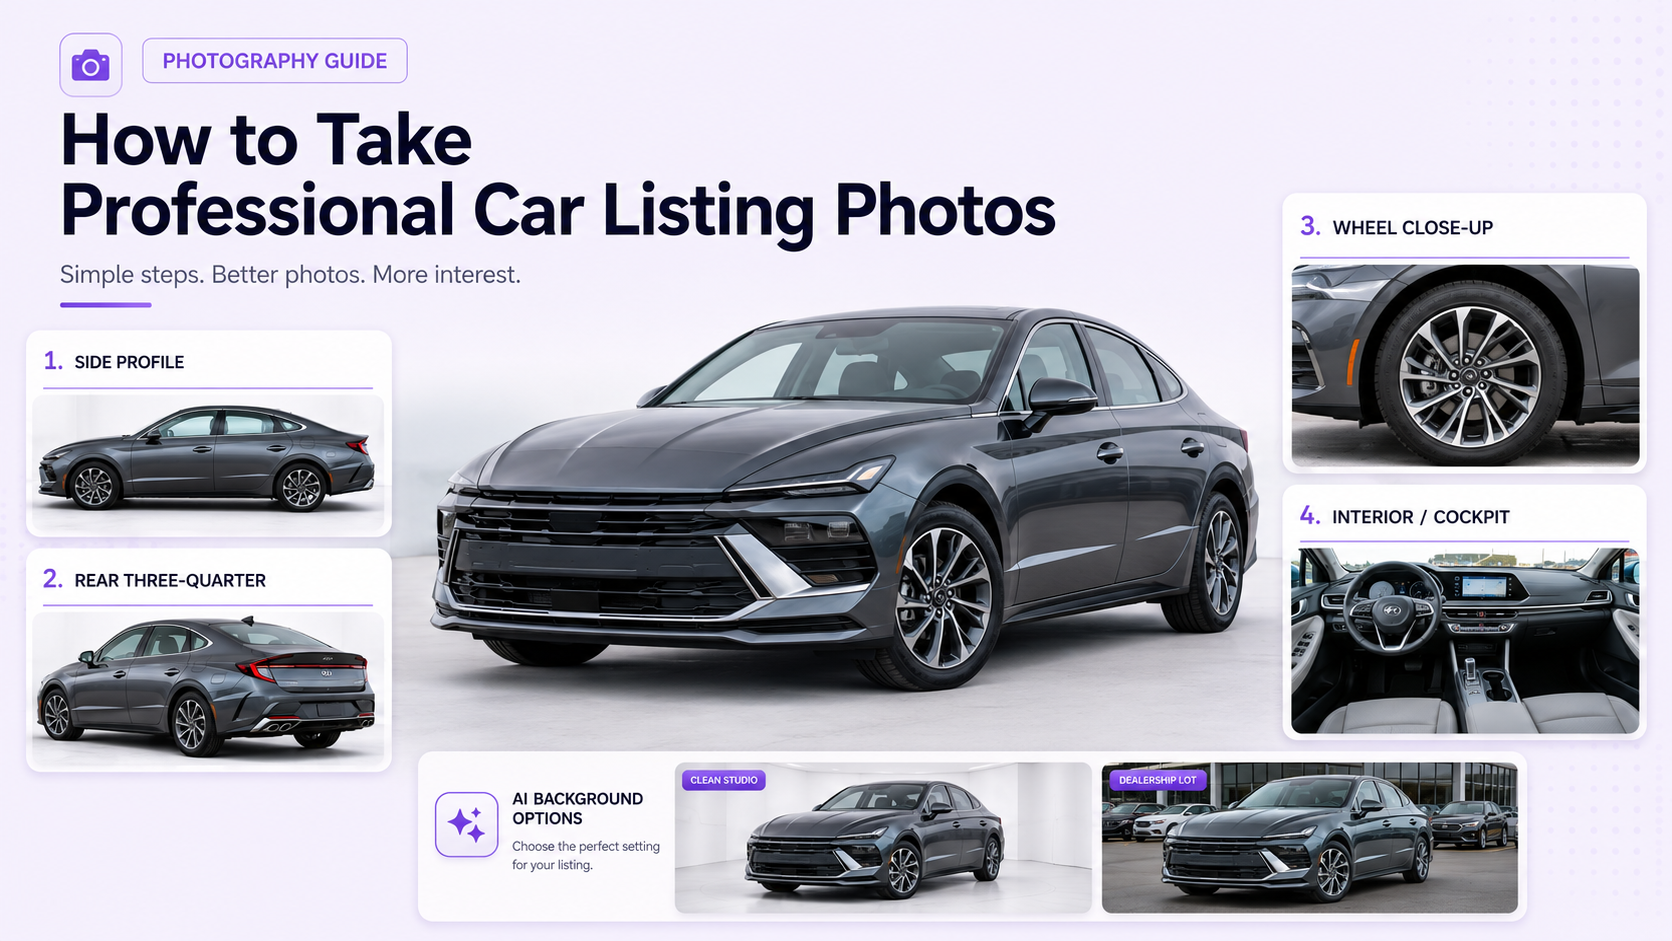
1. Front Three-Quarter View
This is usually the strongest hero image. Show the front, side, headlights, grille, hood, wheels, and overall stance.
2. Straight Front View
Show the grille, headlights, bumper, plate area, hood alignment, and vehicle width.
3. Driver-Side Profile
Show the full side, doors, windows, wheels, roofline, trim, and body proportions.
4. Passenger-Side Profile
Capture the opposite side so buyers can inspect both sides of the body.
5. Rear Three-Quarter View
Show the rear, side, taillights, trunk or hatch shape, bumper, exhaust, and rear wheel.
6. Straight Rear View
Show taillights, rear glass, trunk, hatch, bumper, badges, and plate area.
7. Wheel and Tire Close-Up
Show wheel design, tire condition, sidewall, brake area, and visible curb damage.
8. Roof and Sunroof
Include the roof, panoramic glass, rails, antenna, or convertible mechanism when relevant.
How to Position the Wheels
For the hero image, turn the front wheels slightly toward the camera only when this improves wheel visibility and remains natural.
For side-profile and condition images, keep the wheels straight so alignment and body proportions are easier to judge.
Do not rotate wheels digitally or use AI to replace the wheel design.
Photograph Important Exterior Details
Headlights and Taillights
Show lens clarity, lighting design, and condition. Avoid overexposing illuminated lights.
Grille and Badges
Keep manufacturer marks, model badges, trim labels, and grille details accurate.
Paint and Body Panels
Capture reflections and panel alignment clearly enough to show real condition.
Existing Damage
Photograph scratches, dents, chips, cracked lights, damaged wheels, and other known issues honestly.
Charging Port or Fuel Door
Include charging connections, fuel access, and related features where relevant.
Tow Bar, Roof Rails, or Accessories
Show permanent or included exterior accessories clearly.
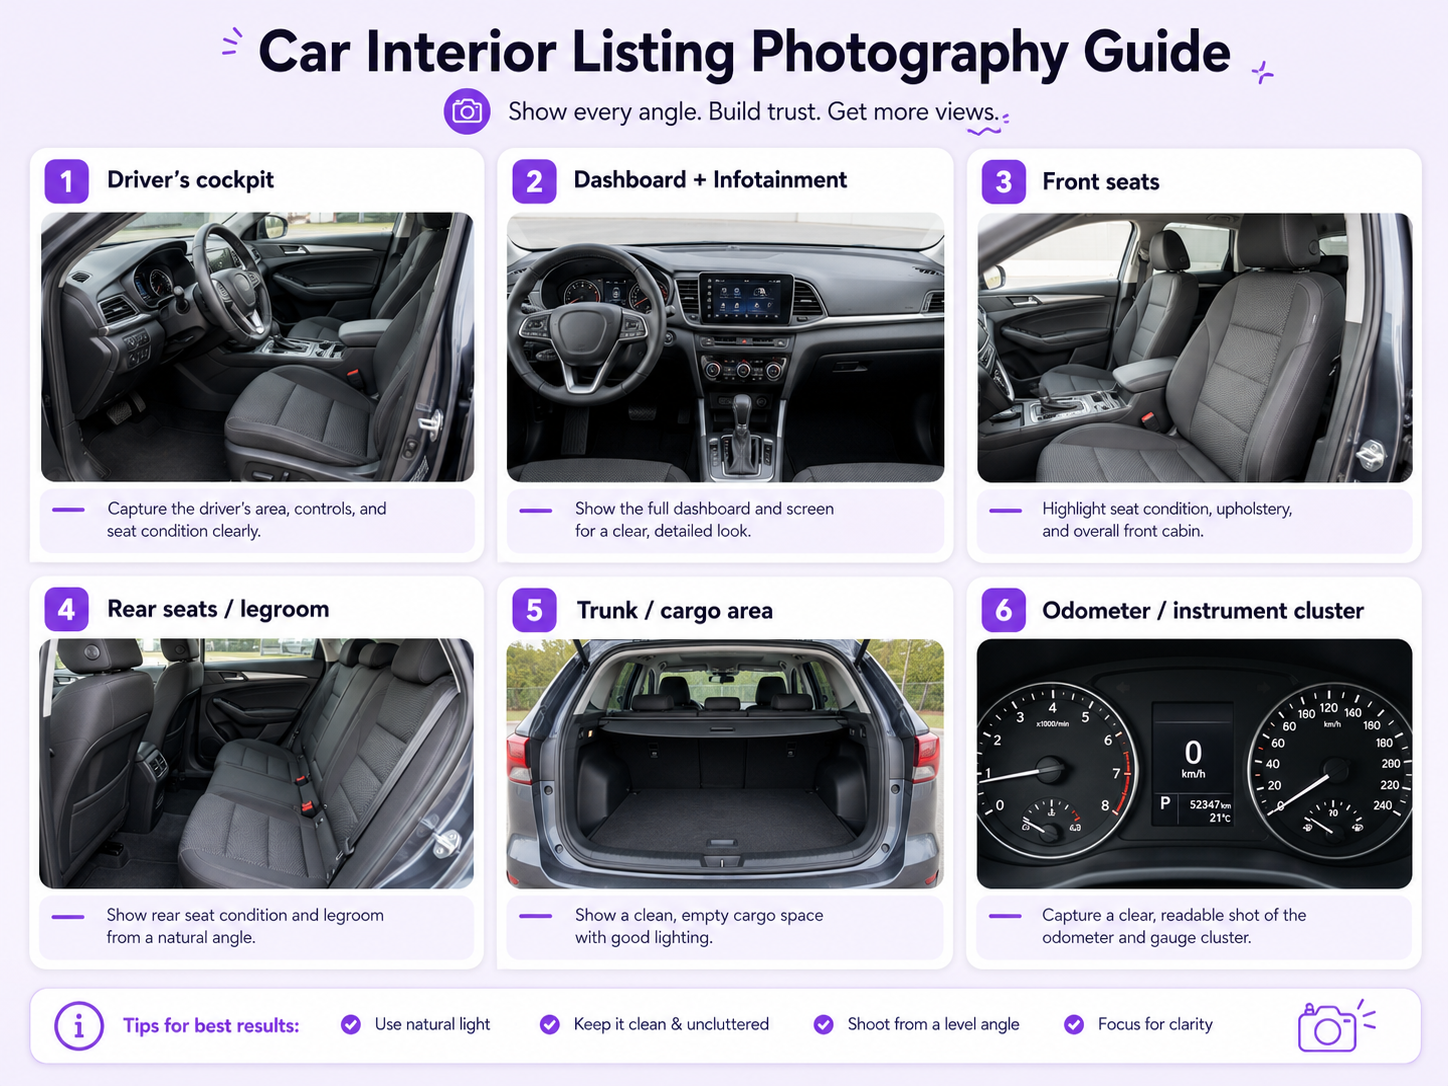
How to Photograph the Car Interior
Interior photos should explain condition, materials, controls, seating, technology, and storage.
Open the doors to allow more light where appropriate. Keep the camera level and avoid extreme wide-angle views that distort the dashboard or cabin.
Driver’s Cockpit
Photograph from the open driver’s door to show the steering wheel, dashboard, instrument panel, center console, and front seats.
Dashboard and Infotainment
Show the screen, controls, climate system, vents, gear selector, and dashboard layout.
Front Seats
Show upholstery, bolsters, headrests, adjustment controls, armrests, and visible wear.
Rear Seats
Photograph legroom, upholstery, headrests, center armrest, child-seat points, and rear vents where relevant.
Trunk or Cargo Area
Show the full cargo space, floor condition, parcel shelf, spare wheel area, charging cables, and included accessories.
Door Panels and Controls
Include premium trim, window controls, speakers, storage, and material condition.
Roof, Sunroof, and Headliner
Show panoramic glass, sunroof controls, interior roof condition, and cabin lighting.
Odometer and Dashboard
Capture the mileage and warning-light state accurately when appropriate for the listing.
Use a Phone for Car Listing Photos
A modern phone can create strong car listing images when the light is controlled and the lens is clean.
Use the main rear camera for most views. Avoid the ultra-wide lens unless the space is very tight and distortion remains controlled.
Turn on the grid, keep the phone level, tap the car to focus, and lower exposure slightly when bright paint or sky begins to lose detail.
Take several versions of each angle and choose the sharpest, most balanced image.
Use a Camera for More Control
A camera provides greater control over focal length, exposure, dynamic range, reflections, and low-light quality.
Use a moderate focal length, low ISO, stable shutter speed, and aperture that keeps the full vehicle sharp.
A circular polarizing filter can reduce some reflections, but rotating it too far may create uneven windows, paint, or sky. Use it carefully.
Control Reflections
Cars reflect the photographer, nearby vehicles, buildings, trees, signs, sky, and ground.
Walk around the vehicle before shooting and look for unwanted reflections across the body panels and glass.
Move the car or camera slightly rather than relying on heavy editing. Reflections help define the shape of the body, so removing all of them can make the car look artificial.
How GenImagePro Can Improve Car Listing Photos
GenImagePro can extend a basic car shoot into several listing and marketing formats while keeping the real vehicle as the source.
The strongest workflow begins with a clean exterior photo and uses AI to improve the surrounding presentation rather than redesign the vehicle.
Replace Distracting Backgrounds
Turn a cluttered parking lot, residential driveway, or busy street into a clean dealership, studio, showroom, premium outdoor, or neutral marketplace background.
Improve Lighting
Balance exposure, reduce harsh shadows, recover paint detail, and create more consistent light across multiple images.
Remove Temporary Distractions
Clean selected bins, cones, signs, cables, reflections, or unrelated background objects without altering the vehicle.
Expand the Canvas
Create more space around the car for website banners, dealership ads, social posts, and vertical story formats.
Create Coordinated Variations
Generate clean listing, luxury studio, outdoor lifestyle, dealership, social advertisement, and website hero versions from the same reference image.
Standardize Dealer Inventory
Use consistent background, crop, scale, lighting, and shadow treatment across vehicles photographed at different times or locations.
GenImagePro Car Background Workflow
Upload a clear car image where the full vehicle is visible and important details are sharp.
Choose a car photography or background template that matches the intended channel, such as clean listing, dealership showroom, premium studio, urban exterior, or luxury campaign.
Generate several variations and compare the car against the original. Inspect wheels, badges, lights, windows, mirrors, body lines, paint, trim, plate area, and proportions.
Export separate sizes for marketplace listings, dealership websites, social media, advertisements, and banners.
Car Photography Prompt Formula
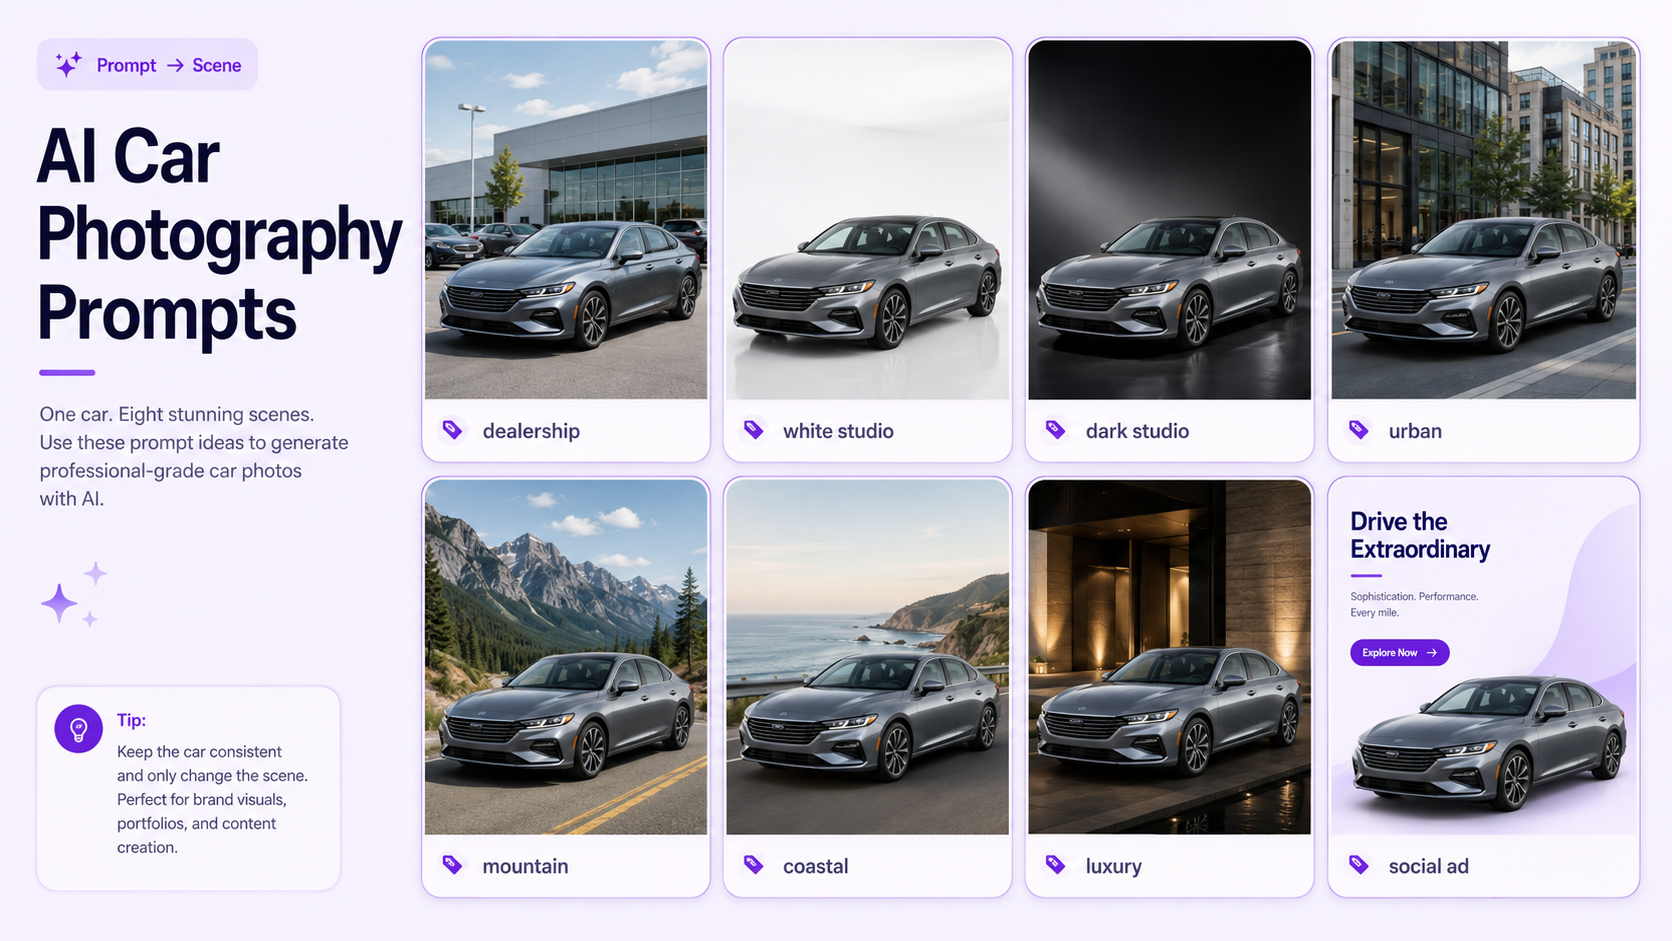
Clean Dealership Listing Prompt
Place the uploaded car in a clean modern dealership exterior with neutral paving, soft overcast daylight, realistic tire contact shadows, clear body reflections, and a balanced front three-quarter composition. Preserve the exact vehicle, paint, wheels, lights, trim, badges, windows, and proportions.
White Automotive Studio Prompt
Create a clean automotive studio image with a soft white-to-light-gray background, broad diffused lighting, realistic floor shadow, controlled reflections, and centered listing composition. Keep every vehicle detail unchanged.
Place the uploaded car in a deep charcoal automotive studio with controlled rim lighting, subtle floor reflection, premium contrast, and a realistic three-quarter view. Preserve the exact paint color, body, wheels, glass, lights, trim, badges, and scale.
Outdoor Marketplace Prompt
Place the uploaded vehicle in a clean open outdoor setting with neutral pavement, soft natural daylight, minimal background distraction, realistic reflections, and accurate paint color. Keep the actual car and all condition details unchanged.
What AI Must Not Change
Make, model, generation, body style, or trim.
Paint color, finish, body panels, proportions, or ride height.
Wheel design, tire size, brake details, or suspension stance.
Headlights, taillights, mirrors, windows, badges, grille, or plate area.
Interior color, steering wheel, seats, dashboard, controls, screens, or materials.
Visible scratches, dents, wheel damage, warning lights, or other relevant condition details.
Included accessories, charging equipment, roof rails, tow bar, or permanent features.
Edit Car Listing Photos Consistently
Begin with exposure, white balance, crop, perspective, and shadow detail.
Protect the real paint color. Strong saturation, contrast, warmth, or cool color grading can make the car appear different.
Use similar crop, camera height, car scale, background treatment, and brightness across the full listing.
Do not sharpen so aggressively that body lines, chrome, badges, and wheel details develop halos.
Remove the License Plate Carefully
Some sellers blur or cover the plate for privacy. Use a consistent, clean treatment that does not damage the bumper, grille, lights, or surrounding bodywork.
Do not generate a false registration number or replace the plate with branding that could confuse viewers.
Follow the rules of the marketplace or dealership platform where the listing will appear.
Create a Complete Car Listing Image Set
A useful listing may include a front three-quarter hero image, front, both sides, rear three-quarter, rear, wheels, body details, cockpit, dashboard, front seats, rear seats, trunk, roof, odometer, and known damage.
The exact number depends on the vehicle. Luxury, performance, classic, modified, commercial, and highly equipped cars may need more detail images.
Avoid repeating nearly identical angles. Each image should answer a new buyer question.
Order the Images Logically
Start with the strongest front three-quarter image.
Continue around the exterior in a consistent direction, then show wheels and condition details.
Move into the cockpit, dashboard, seats, rear cabin, trunk, and feature close-ups.
Place damage documentation clearly rather than hiding it at the end of the gallery.
Common Car Listing Photography Mistakes
Photographing a Dirty Vehicle
Dirt, brake dust, fingerprints, and interior clutter reduce trust and make editing harder.
Using a Busy Background
Other cars, signs, bins, buildings, and people compete with the vehicle.
Using Extreme Wide-Angle Views
Distortion can exaggerate the grille, wheels, cabin, or body length.
Showing Too Few Angles
Missing sides, interior areas, wheels, or damage creates uncertainty.
Hiding Condition
Removing dents, scratches, worn upholstery, wheel damage, or warning lights misrepresents the vehicle.
Changing the Car with AI
Generated wheels, badges, paint, lights, body kits, interiors, or proportions make the image inaccurate.
Using Inconsistent Photos
Different crops, locations, lighting, and color treatment make the listing feel disorganized.
Overusing Dramatic Editing
Extreme contrast, dark shadows, cinematic color, artificial reflections, or excessive glow may reduce listing clarity.
Car Listing Photo Checklist
Clean the exterior, wheels, windows, mirrors, cabin, trunk, and screens.
Choose a simple location with level ground and soft light.
Capture the complete exterior sequence, interior, features, wheels, and known condition issues.
Check paint color, body shape, trim, lights, glass, badges, wheels, and interior accuracy.
Review AI-generated backgrounds for changed vehicle details, unrealistic reflections, or incorrect shadows.
Use consistent crop, scale, lighting, and background treatment across the full listing.
Export separate versions for marketplaces, dealership sites, social media, advertisements, and banners.
Final Recommendation
Professional car listing photos begin with an accurate, clean, and complete record of the real vehicle.
Use soft light, consistent camera height, natural focal lengths, controlled reflections, and a logical sequence of exterior and interior views.
Use GenImagePro to improve the surrounding presentation: replace distracting locations, standardize dealership inventory, enhance lighting, remove temporary background clutter, expand compositions, and create coordinated campaign variations.
The real car must remain unchanged. Every AI result should be compared with the source before it is used in a listing.
FAQ
How do I take professional photos of a car for sale?
Clean the vehicle, choose a simple location, photograph in soft light, use consistent camera height, capture all exterior and interior angles, and edit accurately.
What is the best angle for a car listing photo?
A front three-quarter view is usually the strongest hero image because it shows the front, side, wheels, lights, hood, and overall stance.
Can I take car listing photos with a phone?
Yes. Use the main rear camera, clean the lens, avoid digital zoom, keep the phone level, and photograph in soft controlled light.
What background is best for car listing photos?
Use a clean dealership lot, neutral paved area, simple industrial wall, parking structure, open outdoor setting, or controlled automotive studio.
Can GenImagePro replace a car photo background?
Yes. GenImagePro can place a real vehicle into clean listing, dealership, studio, outdoor, and premium campaign backgrounds while preserving the car.
Can AI improve car listing photos?
AI can improve lighting, clean temporary background distractions, replace locations, expand the canvas, and create coordinated marketing variations.
What should AI preserve in a car photo?
It should preserve the make, model, body, paint, trim, wheels, lights, windows, mirrors, badges, plate area, interior, proportions, and real condition.
Does GenImagePro require a car photography prompt?
Not always. GenImagePro provides ready-made car photography and background templates, allowing users to upload a vehicle photo and choose a visual direction.