Ghost mannequin photography is one of the most recognizable styles of clothing product photography. It gives garments a three-dimensional, worn shape while removing the model or mannequin from the final image.
The result is a clean product photo that helps shoppers see the structure, neckline, sleeves, waist, and overall silhouette of a garment without a person distracting from the product.
Traditionally, creating the effect required photographing clothing on a mannequin and combining multiple images during post-production. Today, the same visual style can also be created or assisted with AI tools, making ghost mannequin photography much more accessible to smaller ecommerce brands.
This guide explains the complete workflow: what ghost mannequin photography is, how to set up a shoot, how the editing process works, and when AI may be a better alternative. For a broader catalog approach, see our guide to clothing photography for ecommerce.
What Is Ghost Mannequin Photography?
Ghost mannequin photography, also known as invisible mannequin photography or the hollow man effect, is a product photography technique used primarily for clothing.
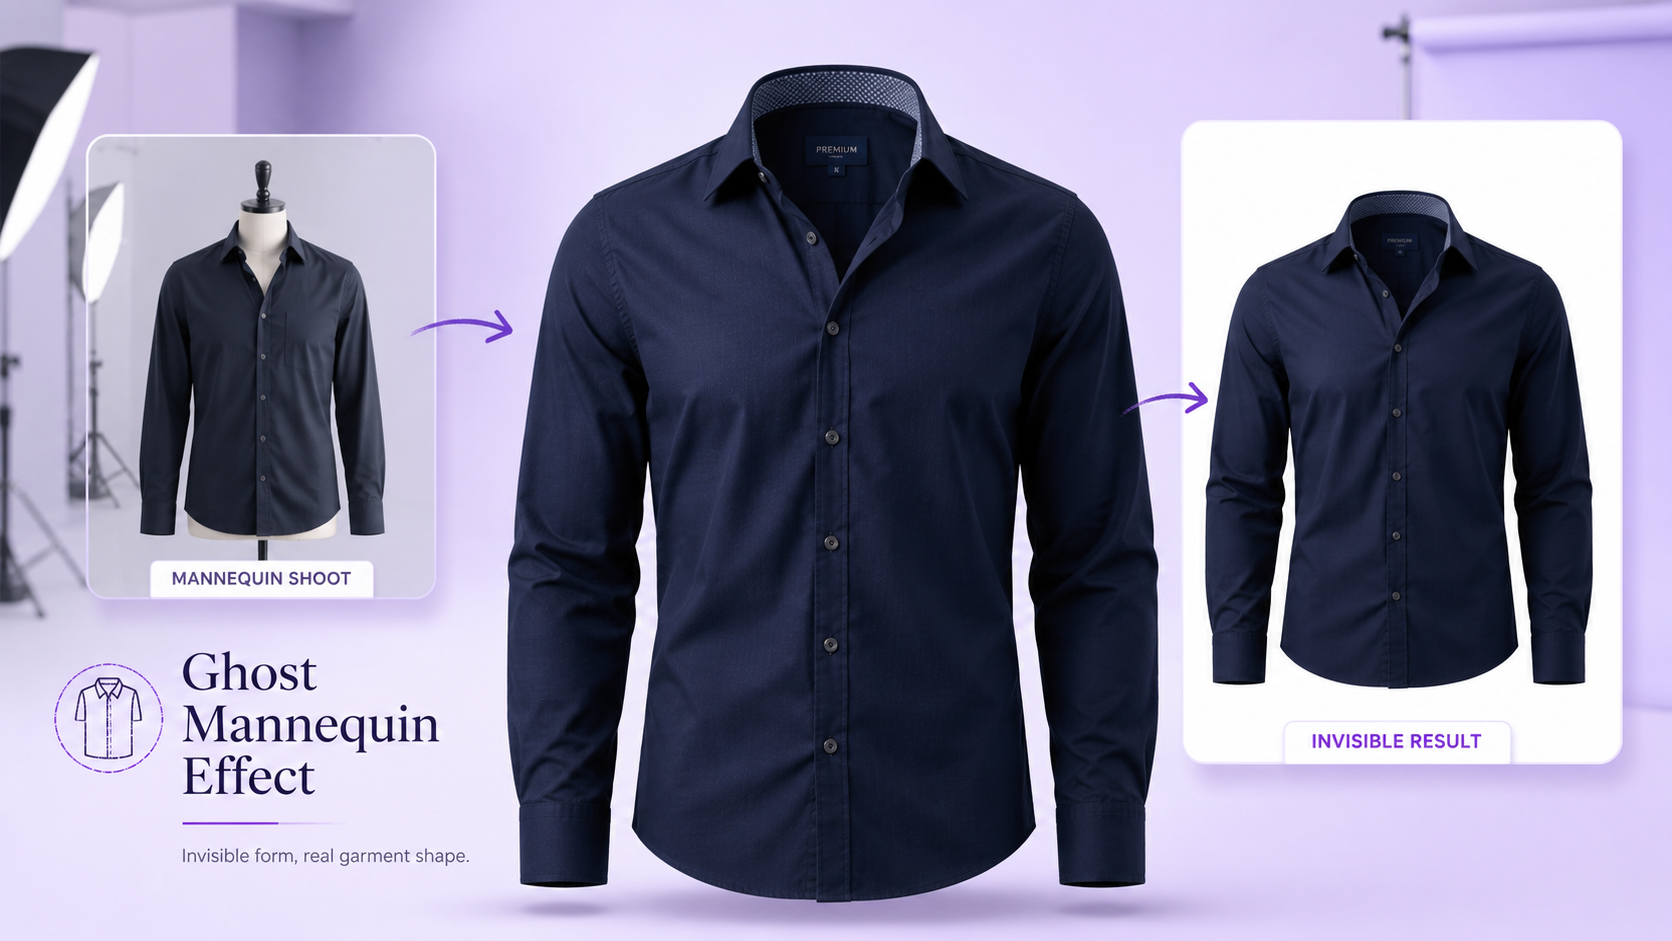
A garment is photographed while being worn by a mannequin. During editing, the mannequin is removed while the shape created by the mannequin remains.
The finished image therefore looks as though the garment is being worn by an invisible person.
Instead of seeing a shirt lying flat, shoppers can see the shape of the shoulders, opening of the collar, depth of the neckline, natural shape of the sleeves, width of the torso, and how the fabric hangs.
Ghost mannequin photography is widely used for ecommerce because it combines some of the dimensional information of model photography with the clean presentation of standard product photography.
What Does the Ghost Mannequin Effect Look Like?
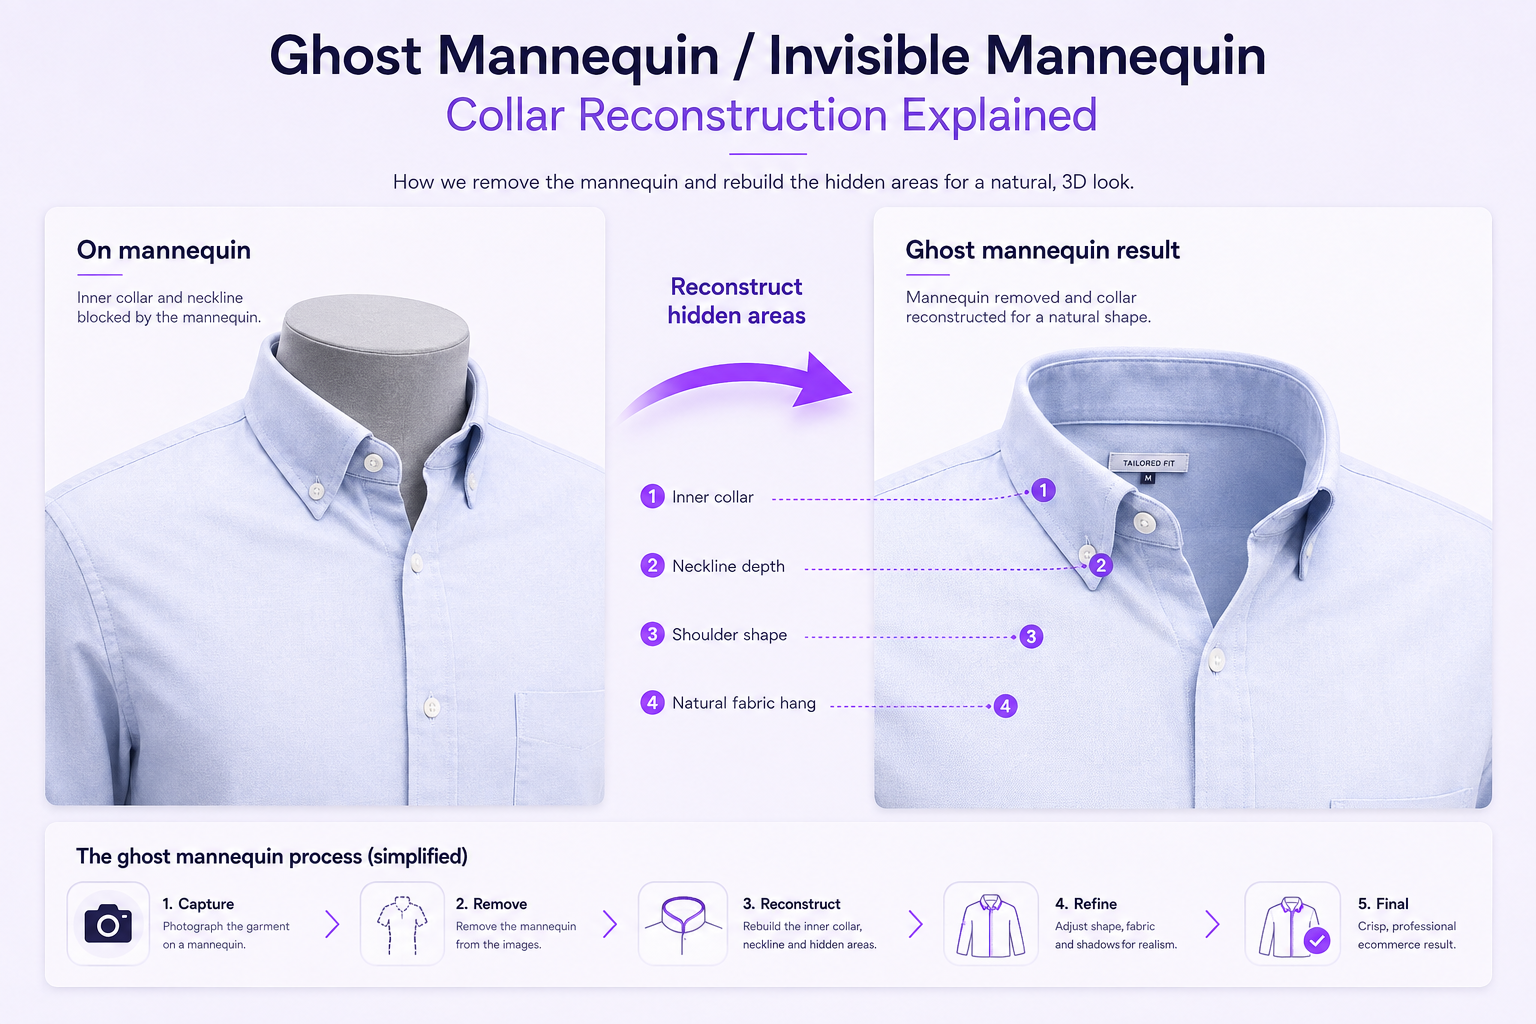
The easiest place to notice the effect is around the neck of a shirt, jacket, dress, or sweater.
Imagine photographing a button-down shirt on a mannequin. If you simply erase the mannequin, part of the inside of the collar will be missing because the mannequin was physically covering it.
A proper ghost mannequin image reconstructs that hidden area. The final image shows the complete outside of the garment, the inside rear portion of the collar, often the inside label, natural depth around the neckline, and realistic garment volume.
The final image creates the illusion that an invisible body is supporting the garment.
Why Use Ghost Mannequin Photography for Ecommerce?
Clothing is difficult to evaluate from a flat image. A flat lay can show color and design clearly, but it may not communicate how structured a blazer is, how deep a neckline sits, or how a dress forms around the body.
Ghost mannequin images add this missing dimension while keeping the visual focus on the product.
Shows Garment Shape
The garment keeps a body-like structure instead of collapsing onto a flat surface. This is especially useful for shirts, jackets, blazers, dresses, sweaters, hoodies, and other structured tops.
Keeps Attention on the Product
Model photography introduces another visual element: the model. That is useful for lifestyle and campaign photography, but ecommerce catalog images often need to focus almost entirely on the garment.
Ghost mannequin photography removes that distraction while preserving a realistic worn shape.
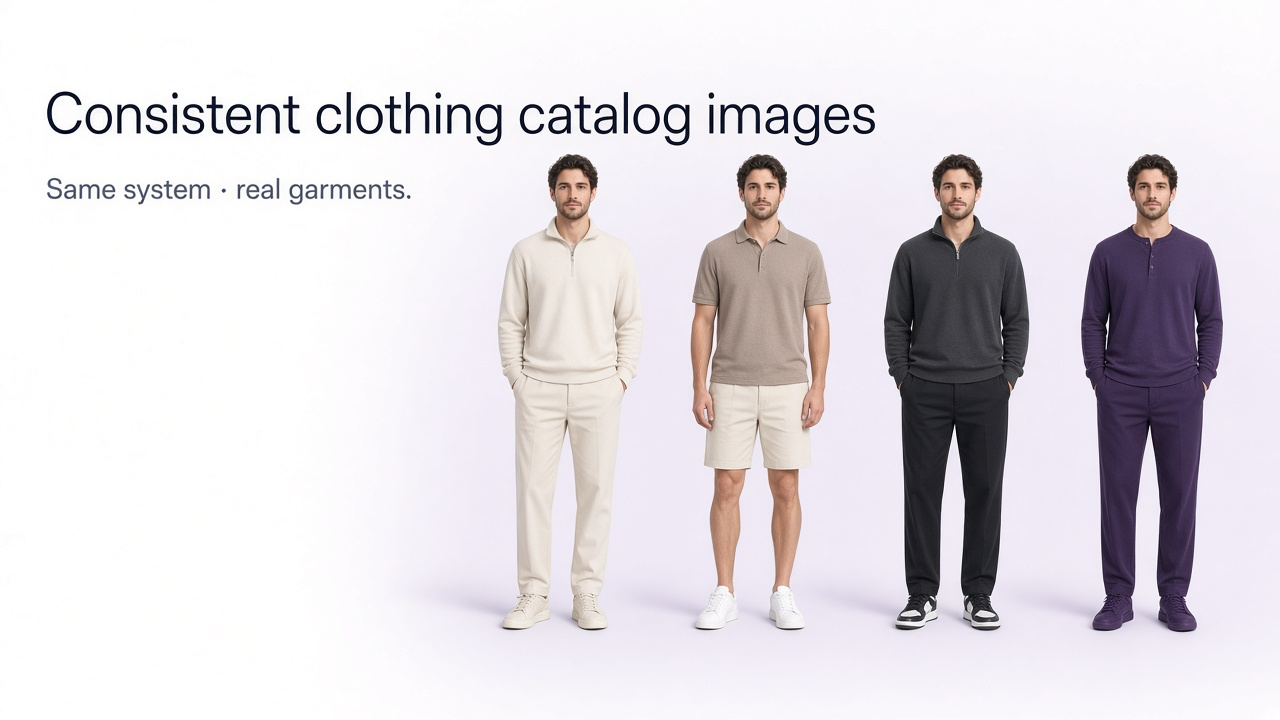
Creates Consistent Catalog Images
Using the same mannequin position, camera angle, lighting, background, and crop can produce a highly consistent series of product images.
This is especially useful when an online store contains dozens or hundreds of clothing products.
Shows More Construction Detail
Necklines, cuffs, collars, hems, and internal areas can be easier to understand when the garment maintains its three-dimensional form.
Ghost Mannequin Photography Setup
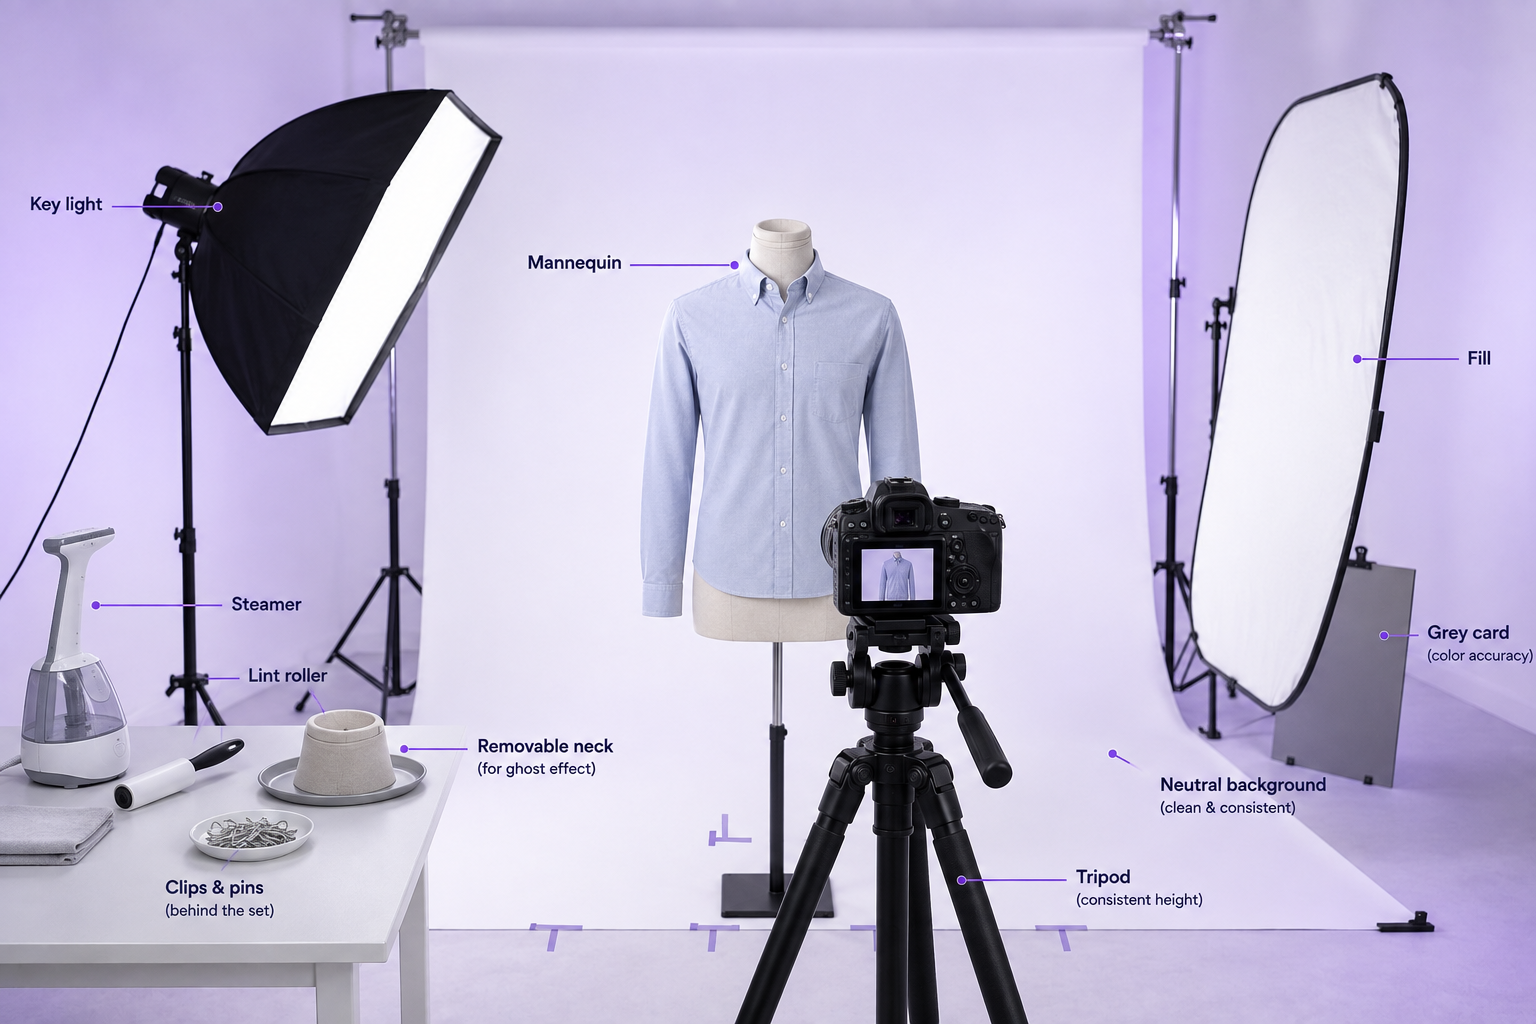
A traditional ghost mannequin setup does not need to be extremely complicated, but consistency matters. Typical gear includes a mannequin, camera, tripod, lighting, a neutral background, garment preparation tools, and photo editing software.
1. Choose the Right Mannequin
The mannequin should fit the type and size of clothing you are photographing.
A garment that is significantly larger than the mannequin may sag, while one that is too small may stretch unnaturally.
Professional ghost mannequins often include removable neck, chest, arm, or leg sections. Removing sections during photography can expose areas that would otherwise require more complicated editing later.
A specialized mannequin is helpful but not strictly required. A conventional mannequin can also work when hidden areas are photographed separately.
2. Prepare the Garment
Do not rely on editing to fix basic garment preparation. Small wrinkles or asymmetries that seem insignificant in person can become obvious in a high-resolution ecommerce image.
Steam or iron wrinkles, remove dust and lint, straighten seams, align buttons, fix collars, adjust sleeves, tuck loose labels, and check symmetry before you shoot.
3. Position the Garment Carefully
Place the garment naturally on the mannequin, starting around the shoulders and working downward.
Pins or clips can sometimes be used behind the mannequin to improve the fit as long as they are not visible from the camera angle.
Pay close attention to shoulder alignment, sleeve length, collar position, center line, hem alignment, and fabric tension. The goal is to represent the real construction of the product accurately rather than making every garment appear excessively fitted.
Lighting for Ghost Mannequin Photography
Consistency is more important than dramatic lighting. For ecommerce photography, soft and even illumination generally makes garment details easier to see and makes editing more predictable.
A common setup uses a large key light positioned around 45 degrees from the garment and a second light or reflector on the opposite side to soften shadows.
A white or neutral gray background usually works best for standardized ecommerce imagery.
Keep exposure consistent between products, avoid harsh shadows around collars, watch for dark areas beneath sleeves, maintain visible fabric texture, avoid overexposing white garments, and keep background lighting consistent.
Camera Settings for Ghost Mannequin Photography
There is no single camera setting that works for every studio because exposure depends on lighting power, sensor size, lens choice, and shooting distance.
For ecommerce work, prioritize sharpness, low noise, consistent perspective, and enough depth of field to keep the garment sharp from front to back.
Use a low ISO such as ISO 100 or 200 when possible, start around f/8 to f/11 for sufficient depth of field, use a tripod for consistent framing, shoot with manual exposure for consistency, shoot RAW when possible, and use a moderate focal length to minimize distortion.
How to Photograph Clothes for the Ghost Mannequin Effect
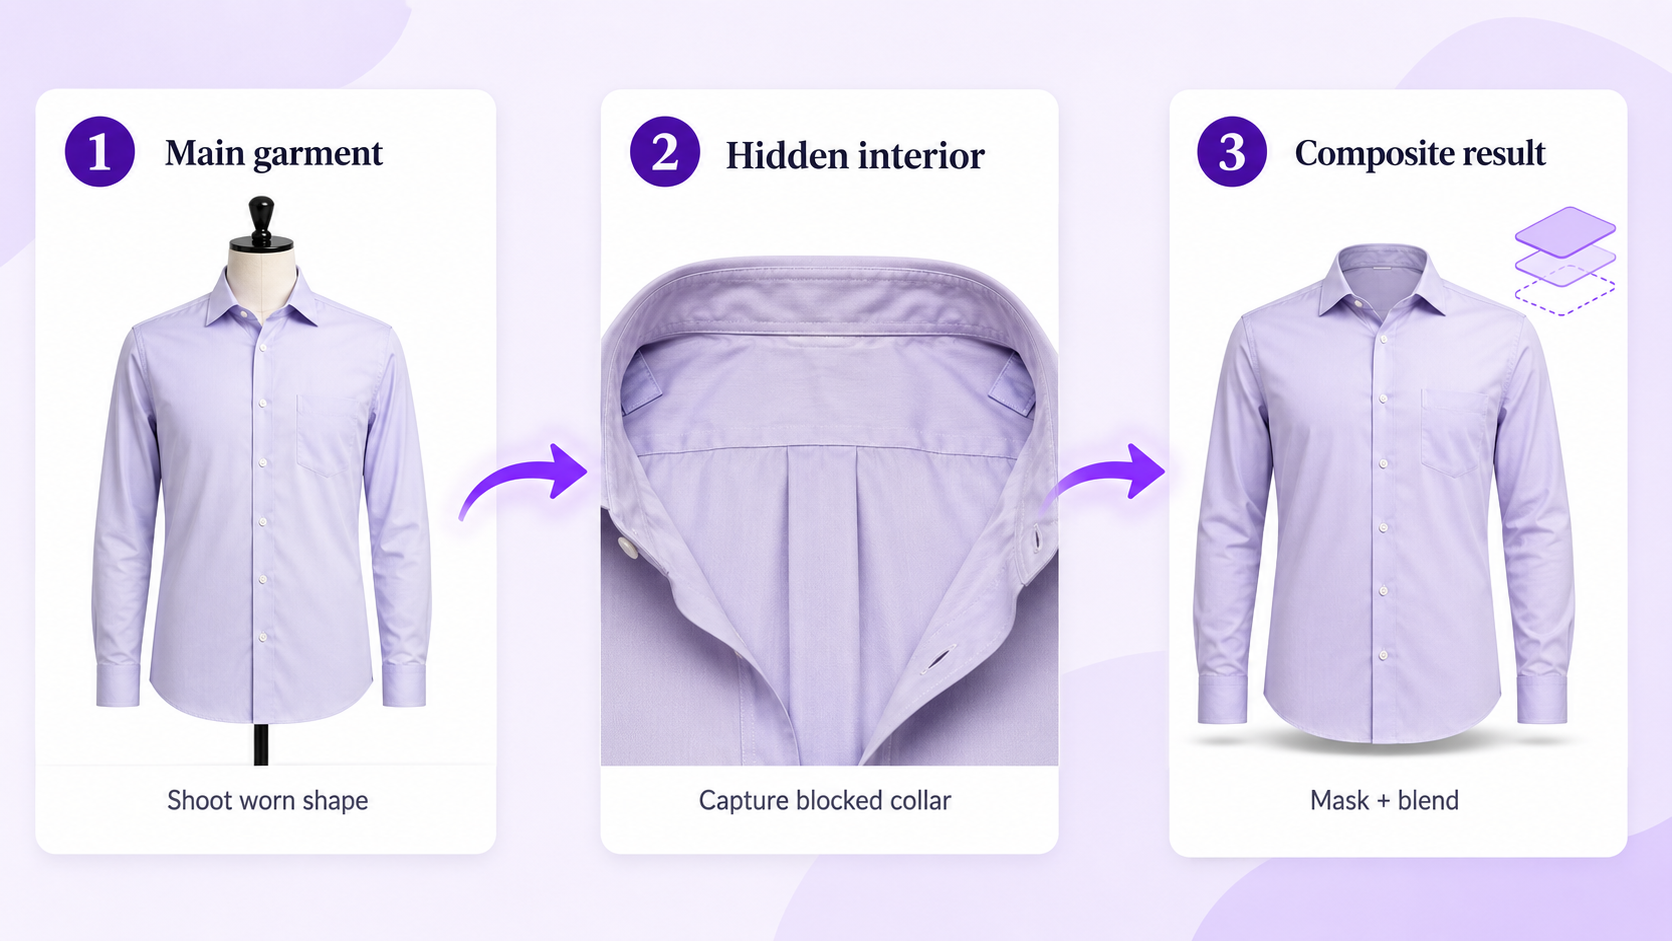
Traditional ghost mannequin photography usually requires more than one photo of each garment.
The primary photograph shows the garment on the mannequin. A second photograph captures the interior area that the mannequin blocks.
Step 1: Photograph the Main Garment
Photograph the garment straight-on with the mannequin supporting its natural shape.
Keep the camera height, distance, focal length, and lighting fixed so every product follows the same visual system.
You then need an image of areas hidden by the mannequin, commonly the back-inside of a collar or neckline.
Depending on the garment, this may require turning the garment inside out, repositioning it, or photographing a separate section.
Step 3: Keep Both Images Consistent
The secondary image should use the same lighting, white balance, focus, and exposure as the primary image.
Large differences between the images make compositing more difficult and can produce visible color or lighting inconsistencies.
How to Create the Ghost Mannequin Effect in Photoshop
The traditional editing workflow combines the main garment photograph with one or more images showing the hidden interior areas.
The exact Photoshop technique varies, but the general process is consistent.
1. Cut Out the Main Garment
Create a precise mask around the garment while preserving important edges such as cuffs, hems, collars, straps, and fabric contours.
2. Remove the Mannequin
Hide the visible mannequin using masks rather than destructive erasing whenever possible.
3. Add the Interior Image
Place the secondary photograph beneath or behind the main garment layer and align the hidden collar, neckline, or internal area with the primary photograph.
4. Blend the Images
Refine the mask until the transition appears natural. Check edges, shadows, fabric texture, color, and perspective.
5. Clean the Final Product Image
Remove dust, temporary pins, stray threads, minor distractions, and remaining mannequin artifacts without changing the actual garment design.
Ghost Mannequin Photography With AI
AI introduces another way to approach ghost mannequin photography.
Instead of manually combining multiple exposures and constructing complex masks, an AI image editing workflow can analyze the garment and generate or reconstruct the missing areas.
This can be particularly useful for smaller ecommerce brands that already have clothing images but do not have access to a dedicated photography studio or professional retouching team.
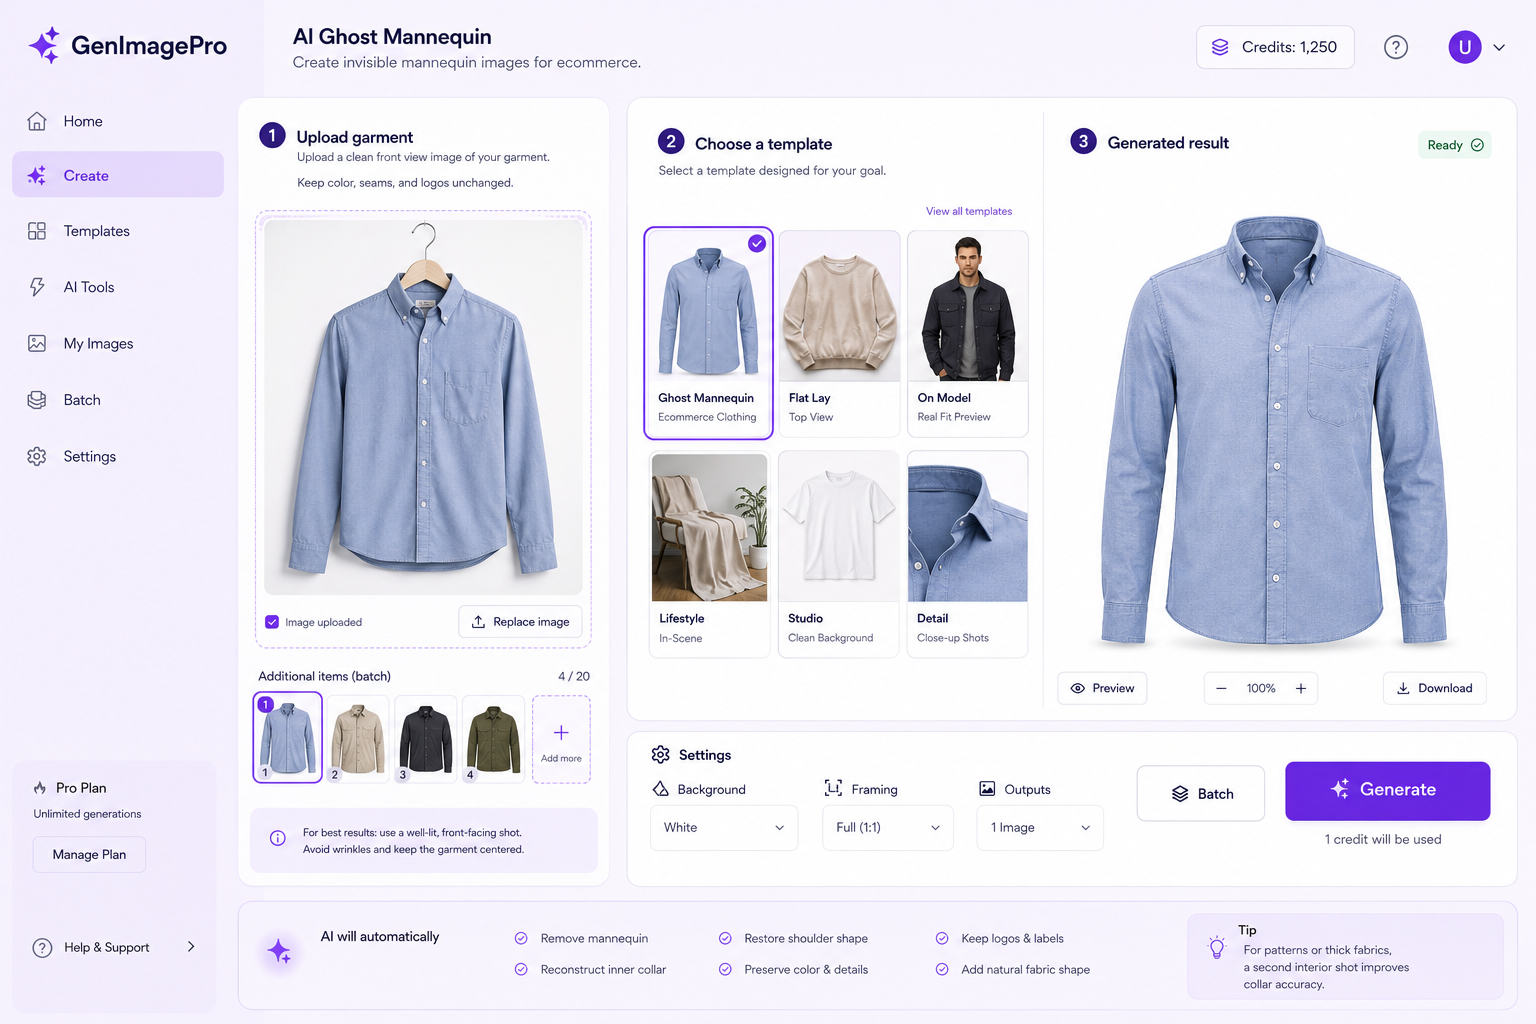
With an AI ghost mannequin workflow, you may be able to upload an existing clothing photo, remove the person or mannequin, reconstruct hidden garment areas, standardize the background, and produce a cleaner ecommerce-ready result.
GenImagePro can turn clear garment photos into ghost-mannequin ecommerce images while preserving fabric texture, seams, collar shape, sleeves, length, color, and branding. Choose a fashion or product template, keep the background and framing consistent, then review the result against the real garment before publishing.
Traditional vs AI Ghost Mannequin Workflow
Traditional workflows usually require a mannequin, multiple photos, extensive manual masking, dedicated photography equipment, and moderate to advanced editing skill. Control is very high, but batch work is labor intensive.
AI workflows do not always require a mannequin or multiple exposures. Manual masking can be reduced or automated, existing images can often be reused, editing skill requirements are lower, and batch production can be faster. The amount of control depends on the AI tool and how carefully results are reviewed.
Can You Create a Ghost Mannequin Effect Without a Mannequin?
Yes. A physical mannequin is no longer the only way to create the visual style.
Traditionally, photographers needed some structure inside the garment to preserve its three-dimensional appearance. That could be a mannequin, dress form, or other support.
AI image editing can now infer garment structure from an existing image and generate areas that were previously hidden by a model, hanger, or mannequin.
The quality of the result depends heavily on the source image. Clear garment boundaries, visible construction details, even lighting, and sufficient resolution make reconstruction easier.
Ghost Mannequin vs Flat Lay Photography
Both styles can work well for ecommerce, but they communicate clothing differently.
Ghost mannequin photography shows high garment volume and a body-like shape. Setup and editing complexity are higher, but the format is excellent for structured clothing and solid for catalog pages.
Flat lay photography shows lower garment volume and no body-like shape. Setup and editing are simpler, which makes it excellent for casual social imagery and useful for many basic garments, though it is only moderately effective for highly structured pieces.
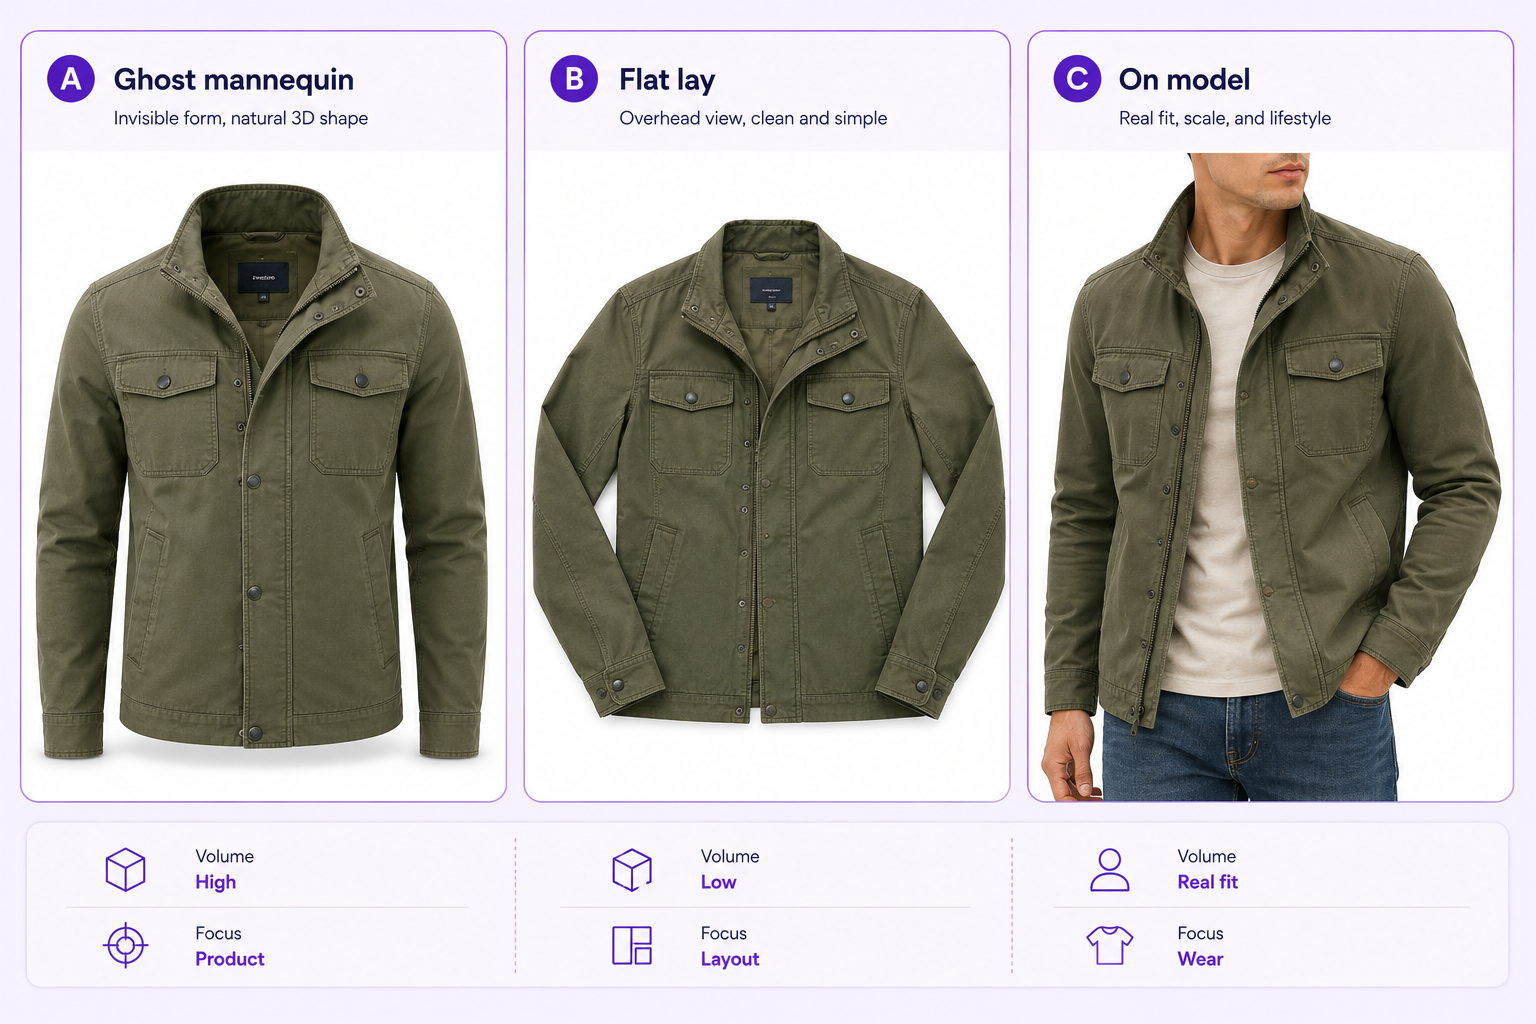
Ghost Mannequin vs Model Photography
Model photography communicates fit, personality, scale, and lifestyle. Ghost mannequin photography prioritizes the garment itself.
Many ecommerce brands benefit from using both rather than treating them as competing formats.
A product gallery can use a clean ghost mannequin image as the primary catalog image and then add model or lifestyle photography to demonstrate fit and styling.
Which Clothing Works Best for Ghost Mannequin Photography?
The technique works particularly well for garments where three-dimensional structure matters, including T-shirts, shirts, blouses, jackets, blazers, sweaters, hoodies, dresses, activewear, trousers, jeans, and coats.
Common Ghost Mannequin Photography Mistakes
The invisible mannequin effect may look simple, but small inconsistencies can quickly make the result appear artificial.
Visible Mannequin Edges
Check carefully around necklines, sleeves, armholes, waistbands, and leg openings for remaining mannequin fragments.
Poorly Aligned Interior Sections
The inner collar or neckline must align naturally with the outer garment. Incorrect perspective immediately breaks the illusion.
Over-Retouching
Removing all folds and texture can make clothing look synthetic. Keep natural fabric characteristics unless they are genuine defects.
Inconsistent Catalog Framing
Changing zoom, crop, camera height, or garment scale from product to product can make an ecommerce category page look inconsistent.
Incorrect Garment Shape
Do not reshape products so aggressively that the final image misrepresents the actual fit or cut.
How Much Does Ghost Mannequin Photography Cost?
The cost varies significantly depending on whether the work is completed in-house, outsourced to a professional studio, or generated with an AI-assisted workflow.
Traditional production can involve equipment, mannequin costs, studio space, photography time, garment preparation, and post-production.
If images are outsourced, pricing may be charged per garment, per image, per shooting day, or as part of a larger ecommerce photography package.
AI-assisted workflows can reduce some photography and editing costs, particularly when usable source images already exist, but they still require quality control.
Best Practices for Ecommerce Ghost Mannequin Images
Use the same aspect ratio across the catalog, keep garment scale consistent, use a consistent background, maintain accurate colors, preserve natural fabric texture, and avoid excessive retouching.
Show front and back views where useful, add detail images for fabric and construction, keep shadows subtle and consistent, and export images at an appropriate ecommerce resolution.
A Faster AI Workflow for Ghost Mannequin Photography
For brands that already have product photos, recreating every item in a professional studio may not always be practical.
An AI workflow can reduce the number of manual steps required to achieve a consistent ghost mannequin look.
A typical workflow is to upload a clear clothing photo, apply a ghost mannequin or fashion product photography transformation, review garment structure and details, standardize the background and framing, and export the final ecommerce image.
In GenImagePro, this can mean uploading a garment reference, choosing a ghost-mannequin or clean ecommerce clothing style, keeping the background and framing consistent across SKUs, generating multiple outputs, and selecting the most accurate result.
The important principle is product fidelity. AI should improve presentation without changing the garment's actual color, construction, logos, patterns, or important design details. For prompt ideas, see our AI prompts for product photography guide, including the ghost-mannequin clothing example.
Final Thoughts
Ghost mannequin photography remains one of the most effective ways to present clothing cleanly online.
The traditional workflow gives photographers precise control over garment shape, lighting, perspective, and post-production. For large professional shoots, that level of control can still be valuable.
AI provides an increasingly practical alternative when brands need to create consistent ecommerce imagery from existing product photos or reduce the amount of manual compositing required.
Whichever workflow you choose, the goal is the same: show the garment clearly, accurately, and consistently while helping shoppers understand its real shape and construction.
FAQ
What is another name for ghost mannequin photography?
Ghost mannequin photography is also commonly called invisible mannequin photography, hollow man photography, or the ghost mannequin effect.
How do you turn a photo into a ghost mannequin image?
Traditionally, the garment is photographed on a mannequin and hidden interior sections are photographed separately. The mannequin is then removed and the images are composited together. AI tools can automate parts of this workflow.
Do you need a special mannequin for ghost mannequin photography?
No, but mannequins with removable neck, arm, chest, or leg sections can make photography and post-production considerably easier.
Can AI create a ghost mannequin effect?
Yes. AI image editing systems can remove models or mannequins, reconstruct hidden garment sections, and create an invisible mannequin appearance from suitable source images. GenImagePro can generate ghost-mannequin ecommerce clothing images from clear garment references.
Can you create ghost mannequin photography without Photoshop?
Yes. AI image editing and automated photo editing tools can now perform much of the ghost mannequin workflow without manually compositing layers in Photoshop.
Is ghost mannequin photography good for ecommerce?
Yes. It gives clothing visible shape and depth while keeping attention on the garment, making it particularly useful for ecommerce catalogs.